[Java] Use C/C++ DLL from Java with JNA

In this article I will create a simple Calculator for example.

- Math function are implemented in DLL (add/sub/mul/dev)

- Use java swing to create GUI

- Use JNA java libary to call math function from DLL


1. Create math C/C++ DLL library

- Open Microsoft Visual Studio

- File > New > Project > Visual C++ > Windows Desktop > Dynamic-Link Library with exports (DLL) 


- Add your source
    Create MyMath.dll with Add/Sub/Mul/Dev function


- Build DLL
    In this test, build Release/x64


    MYMATH.dll will be exported to x64/Release folder


2. Download java JNA library
- Donwload load jna-x.x.x.jar and jna-platform-x.x.x.jar from github
    https://github.com/java-native-access/jna
- JNA wikipedia
    https://en.wikipedia.org/wiki/Java_Native_Interface
- JNA example code
    https://www.eshayne.com/jnaex/index.html

3. Create java GUI application window
   Reference below article to create GUI app and add JNA library to project

- Create GUI
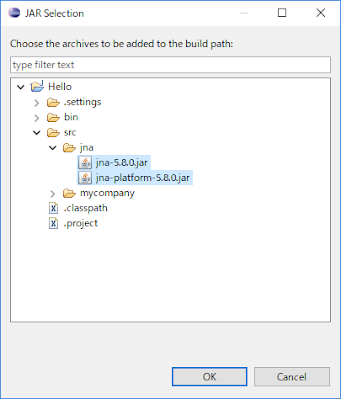
- Add jna-x.x.x.jar and jna-platform-x.x.x.jar to project

- Add JNA interface that define function relative with DLL function


- Add click event for Calculate button and insert Add/Sub/Mul/Dev function what defined in JNA interface


- Put MYMATH.dll into bin folder

- Click Run button in eclipse to run up application

4. Export
- Export java project to runnable jar file

- Copy MYMATH.dll to folder where exported jar file

- Double click on Calculator.jar to use application


※NOTE:
If you put all the C# and C++ dll files in the java project directory, an error will occur. The reason is that although java can find the C++ dll file, but the C# dll file cannot be found, you need to add the C# dll The file is placed in the bin folder under the jdk installation directory of the running machine. problem solved.
Repeat again. The resulting dll file should be consistent with the version of the jdk installed on the running machine (x86 or x64), otherwise a call error will occur.


Wednesday, May 5, 2021
Tag :

[Java] GUI Application (Swing on Eclipse)

1. Install Eclipse for java

    Download and install "Eclipse IDE for Java Developers"

2. Create new project

- Open Eclipse

- File > New > Java Project

- Fill project name

- Click Finish button


- New package
    Right click on src > New > Package


- New Application Window (Swing JFrame)
    Right click on package mycompany > New > Other 

    > select Application Window > Next

    > input Name of application window > Finish


- Drag and drop companent to window
Can switch Source <=> Design


Note:
If Design mode do not display, right click on java source file and select 
Open With > WindowBuilder Editor


3. Add external library

    - Create new folder and put jar into there


Right click on project > Properties > Java Build Path > Libraries > Add JARs...


    > select jar files > OK

    
    External jar files was added to Referenced Libraries


4. Export to Runnable JAR file

Right click on project > Export > Java - Runnable JAR file > Next


    > select "Launch configuration", input "Export destination" > Finish

    
    JAR file will be exported to Export destination folder, double click to run jar file.
    (All external libararies and other project's resource also put in to Hello.jar export file)


Note: Can use command promt with command below
$ java - jar Hello.jar


Chatbox


Tuesday, December 29, 2020

Python - CGI Programming

Saturday, December 5, 2020

Windows Batch Script Tutorial

 https://www.tutorialspoint.com/batch_script/index.htm

https://en.wikibooks.org/wiki/Windows_Batch_Scripting


Ex 1:
call :myhead 2
exit /b

:: Function myhead
:: ===============
:: %1 - lines count
:myhead
setlocal EnableDelayedExpansion
set counter=1
set mycmd=wmic os get LocalDateTime
for /f "tokens=*" %%i in ('%mycmd%') do ( 
  echo %%i
  set /a counter=!counter!+1
  if !counter! gtr %1 exit /b
)
exit /b
Ex2:
setlocal EnableDelayedExpansion
set counter=1
set mycmd=wmic os get LocalDateTime
for /f "tokens=*" %%i in ('%mycmd%') do ( 
  ::echo %%i
  set myresult=%%i
  ::echo !myresult!
  set /a counter=!counter!+1
  if !counter! gtr 2 goto end_wmic
)
:end_wmic
echo %myresult%
Saturday, October 31, 2020

Imagekit Cloud Image API

Thursday, February 20, 2020

Cloudinary Cloud Image API


1.Install

npm install cloudinary

2.API
https://cloudinary.com/documentation/cloudinary_references

nodejs example:

var cloudinary = require('cloudinary').v2;
cloudinary.config({ 
  cloud_name: 'anhcuatui', 
  api_key: '28648234628', 
  api_secret: 'sdfkhksdjweuhuidshfuisdsfu' 
});

//upload image
cloudinary.uploader.upload("girl.jpg", function(error, result) {console.log(result, error)});

//get all resource
cloudinary.api.resources(function(error, result) {console.log(result, error); });

Note:
cloud_name, api_key, api_secret information


- Copyright © Lập trình hệ thống nhúng Linux . Powered by Luong Duy Ninh -