
Showing posts with label Linux PC. Show all posts
Attach webcam to VirtualBox
1. Download and install VirtualBox_Extension_Pack
Check version of installed VirtualBox and download extension pack for this VirtualBox version
root# vboxmanage extpack install Oracle_VM_VirtualBox_Extension_Pack-5.1.30-118389.vbox-extpack
2. Enable USB controller

3. List up camera by below command
user$ VBoxManage list webcams
Video Input Devices: 1
.1 "Integrated_Webcam_HD: Integrate"
/dev/video0
4. Start virtual machine (ex: pi)
5. Attach camera to started machine
user$ vboxmanage controlvm "pi" webcam attach .1
with:
- pi: virtual machine name
- .1 : camera device list up by step 3
Note: Using VLC to test on virtual machine "pi"


Tag :
Linux PC
FFmpeg

1. Merge files
Create a file mylist.txt with all the files you want to have concatenated in the following form (lines starting with a # are ignored):
 # this is a comment
 file '/path/to/file1.mp4'
 file '/path/to/file2.mp4'
 file '/path/to/file3.mp4'
Note that these can be either relative or absolute paths. Then you can stream copy or re-encode your files:
ffmpeg -f concat -i mylist.txt -c copy output.mp4 2. Split
ffmpeg -i input.avi -vcodec copy -acodec copy -ss 00:00:00 -t 00:30:00 output1.avi
3. Convert
ffmpeg -i input.avi output1.mp3
find . -exec ffmpeg -i {} {}.mp3 \;
Tag :
Linux PC
Tự động mount phân vùng ổ cứng trong Fedora
1. Cài đặt phần mềm quản lý disk cho Fedora
2. Sử dụng
- Mở theo đường dẫn:
Applications > Accessories > Disks
- Chọn phân vùng ổ cứng muốn auto mount, ví dụ là Data (NTFS)
- Chọn More Actions > Edit Mount Actions
- Các options như hình thứ 2


- Từ đây, mỗi lần máy tính bootup lên phân vùng Data sẽ tự động được mount vào.

yum install gnome-disk-utility
2. Sử dụng
- Mở theo đường dẫn:
Applications > Accessories > Disks
- Chọn phân vùng ổ cứng muốn auto mount, ví dụ là Data (NTFS)
- Chọn More Actions > Edit Mount Actions
- Các options như hình thứ 2
- Từ đây, mỗi lần máy tính bootup lên phân vùng Data sẽ tự động được mount vào.
Tag :
Linux PC
Environment, Parameter Variables
1. Environment variables
Biến môi trường thường được dùng để chứa các thông tin như là options hoặc các đường dẫn (path) đến một thư mục nào đó.
Để show các biến môt trường mặc định của Linux OS và một số phần mềm tạo ra, bạn dùng lệnh env:
 $ env
 XDG_VTNR=1
 MATE_DESKTOP_SESSION_ID=this-is-deprecated
 SSH_AGENT_PID=1421
 XDG_SESSION_ID=1
 HOSTNAME=localhost.localdomain
 XDG_GREETER_DATA_DIR=/var/lib/lightdm-data/ninhld
 IMSETTINGS_INTEGRATE_DESKTOP=yes
 GPG_AGENT_INFO=/home/ninhld/.cache/keyring-fbkBhK/gpg:0:1
 TERM=xterm-256color
 SHELL=/bin/bash
 HISTSIZE=1000
 WINDOWID=73400351
 GNOME_KEYRING_CONTROL=/home/ninhld/.cache/keyring-fbkBhK
 QTDIR=/usr/lib64/qt-3.3
 QTINC=/usr/lib64/qt-3.3/include
 IMSETTINGS_MODULE=IBus
 QT_GRAPHICSSYSTEM_CHECKED=1
 USER=ninhld
 LS_COLORS=rs=0:di=38;5;27:ln=38;5;51:mh=44;38;5;15:pi=40;38;5;11:so=38;5;13:do=38;5;5:bd=48;5;232;38;5;11:cd=48;5;232;38;5;3:or=48;5;232;38;5;9:mi=05;48;5;232;38;5;15:su=48;5;196;38;5;15:sg=48;5;11;38;5;16:ca=48;5;196;38;5;226:tw=48;5;10;38;5;16:ow=48;5;10;38;5;21:st=48;5;21;38;5;15:ex=38;5;34:*.tar=38;5;9:*.tgz=38;5;9:*.arc=38;5;9:*.arj=38;5;9:*.taz=38;5;9:*.lha=38;5;9:*.lzh=38;5;9:*.lzma=38;5;9:*.tlz=38;5;9:*.txz=38;5;9:*.tzo=38;5;9:*.t7z=38;5;9:*.zip=38;5;9:*.z=38;5;9:*.Z=38;5;9:*.dz=38;5;9:*.gz=38;5;9:*.lrz=38;5;9:*.lz=38;5;9:*.lzo=38;5;9:*.xz=38;5;9:*.bz2=38;5;9:*.bz=38;5;9:*.tbz=38;5;9:*.tbz2=38;5;9:*.tz=38;5;9:*.deb=38;5;9:*.rpm=38;5;9:*.jar=38;5;9:*.war=38;5;9:*.ear=38;5;9:*.sar=38;5;9:*.rar=38;5;9:*.alz=38;5;9:*.ace=38;5;9:*.zoo=38;5;9:*.cpio=38;5;9:*.7z=38;5;9:*.rz=38;5;9:*.cab=38;5;9:*.jpg=38;5;13:*.jpeg=38;5;13:*.gif=38;5;13:*.bmp=38;5;13:*.pbm=38;5;13:*.pgm=38;5;13:*.ppm=38;5;13:*.tga=38;5;13:*.xbm=38;5;13:*.xpm=38;5;13:*.tif=38;5;13:*.tiff=38;5;13:*.png=38;5;13:*.svg=38;5;13:*.svgz=38;5;13:*.mng=38;5;13:*.pcx=38;5;13:*.mov=38;5;13:*.mpg=38;5;13:*.mpeg=38;5;13:*.m2v=38;5;13:*.mkv=38;5;13:*.ogm=38;5;13:*.mp4=38;5;13:*.m4v=38;5;13:*.mp4v=38;5;13:*.vob=38;5;13:*.qt=38;5;13:*.nuv=38;5;13:*.wmv=38;5;13:*.asf=38;5;13:*.rm=38;5;13:*.rmvb=38;5;13:*.flc=38;5;13:*.avi=38;5;13:*.fli=38;5;13:*.flv=38;5;13:*.gl=38;5;13:*.dl=38;5;13:*.xcf=38;5;13:*.xwd=38;5;13:*.yuv=38;5;13:*.cgm=38;5;13:*.emf=38;5;13:*.axv=38;5;13:*.anx=38;5;13:*.ogv=38;5;13:*.ogx=38;5;13:*.aac=38;5;45:*.au=38;5;45:*.flac=38;5;45:*.mid=38;5;45:*.midi=38;5;45:*.mka=38;5;45:*.mp3=38;5;45:*.mpc=38;5;45:*.ogg=38;5;45:*.ra=38;5;45:*.wav=38;5;45:*.axa=38;5;45:*.oga=38;5;45:*.spx=38;5;45:*.xspf=38;5;45:
 XDG_SESSION_PATH=/org/freedesktop/DisplayManager/Session0
 XDG_SEAT_PATH=/org/freedesktop/DisplayManager/Seat0
 SSH_AUTH_SOCK=/home/ninhld/.cache/keyring-fbkBhK/ssh
 SESSION_MANAGER=local/unix:@/tmp/.ICE-unix/1324,unix/unix:/tmp/.ICE-unix/1324
 PATH=/usr/lib64/qt-3.3/bin:/usr/lib64/ccache:/usr/local/bin:/usr/bin:/bin:/usr/local/sbin:/usr/sbin:/home/ninhld/.local/bin:/home/ninhld/bin
 MAIL=/var/spool/mail/ninhld
 DESKTOP_SESSION=mate
 QT_IM_MODULE=xim
 PWD=/home/ninhld
 XMODIFIERS=@im=ibus
 GNOME_KEYRING_PID=1320
 LANG=en_US.utf8
 KDE_IS_PRELINKED=1
 GDM_LANG=en_US.utf8
 KDEDIRS=/usr
 GDMSESSION=mate
 HISTCONTROL=ignoredups
 HOME=/home/ninhld
 XDG_SEAT=seat0
 SHLVL=2
 LOGNAME=ninhld
 QTLIB=/usr/lib64/qt-3.3/lib
 DBUS_SESSION_BUS_ADDRESS=unix:abstract=/tmp/dbus-MoTJpiQTi2,guid=1471c082de74b829c532fffc5593dfa5
 LESSOPEN=||/usr/bin/lesspipe.sh %s
 XDG_RUNTIME_DIR=/run/user/1000
 DISPLAY=:0.0
 CCACHE_HASHDIR=
 COLORTERM=mate-terminal
 XAUTHORITY=/var/run/lightdm/ninhld/xauthority
 _=/usr/bin/env
Biến môi trường mặc định:

Để có thể show nội dung của một biến môi trường cụ thể nào đó bạn dùng lệnh echo:
 [ninhld@localhost env]$ echo $HOME
 /home/ninhld
 [ninhld@localhost env]$
 [ninhld@localhost env]$
 [ninhld@localhost env]$ echo $PATH
 /usr/lib64/qt-3.3/bin:/usr/lib64/ccache:/usr/local/bin:/usr/bin:/bin:/usr/local/sbin:/usr/sbin:/home/ninhld/.local/bin:/home/ninhld/bin
 [ninhld@localhost env]$
Phạm vi hoạt động biến môi trường:
+ Local
Biến chỉ có giá trị trong phạm vi ngữ cảnh của terminal, các script hoặc chương trình khác không thể đọc được nội dung của biến
+ Global
Phạm vị toàn cục, các script hoặc chương trình ngoài có thể đọc được nội dung biến, để tạo ra biến global dùng lệnh export trên terminal
Ví dụ có một Shell script để show các biến môi trường như sau:
env.sh
 #!/bin/sh
 echo "HELLO=$HELLO"
 echo "XINCHAO=$XINCHAO"
Command
 [ninhld@localhost env]$
 [ninhld@localhost env]$ HELLO=hello             #bien local
 [ninhld@localhost env]$ export XINCHAO=xinchao  #bien global
 [ninhld@localhost env]$
 [ninhld@localhost env]$ ./env.sh
 HELLO=             #khong doc duoc
 XINCHAO=xinchao    #doc duoc gia tri
 [ninhld@localhost env]$
2. Parameter variable
Là các đối số được đưa vào một Shell script, gần giống như đối số đưa vào một hàm trong C/C++.

para.sh
 #!/bin/sh
 echo "para1 = $1"
 echo "para2 = $2"
 echo "para3 = $3"

 echo "\$* = $*"
 echo "\$@ = $@"
Execute
 [ninhld@localhost env]$
 [ninhld@localhost env]$ ./para.sh pa1 pa2 pa3
 para1 = pa1
 para2 = pa2
 para3 = pa3
 $* = pa1 pa2 pa3
 $@ = pa1 pa2 pa3
 [ninhld@localhost env]$
3. Một số biến môi trường quan trọng
+ PATH
Chỉ đường dẫn đến các thư mục chứa file chương trình nhị phân hoặc script.
Ex:
 [ninhld@localhost env]$
 [ninhld@localhost env]$ export PATH=$PATH:/home/ninhld/Github/eslinuxprogramming/Shell
 [ninhld@localhost env]$
 [ninhld@localhost env]$ cd $HOME
 [ninhld@localhost ~]$
 [ninhld@localhost ~]$ para.sh pa1 pa2 pa3
 para1 = pa1
 para2 = pa2
 para3 = pa3
 $* = pa1 pa2 pa3
 $@ = pa1 pa2 pa3
 [ninhld@localhost ~]$
Chương trình para.sh ở trong thư mục Shell, nhờ việc export biến PATH mà para.sh có thể được chạy ở bất cứ đâu mà không cần thư mục làm việc hiện tại trên terminal phải là Shell.
+ LD_LIBRARY_PATH
Biến môi trường của linker chỉ dẫn đến thư mục chứa các thư viện đã được installed, dùng trong quá trình compile thư viện cũng như khi chạy chương trình ứng dụng có sử dụng thư viện đã installed đó.
Bài viết liên quan:
+ Makefile
+ Cross compiling the libraries
+ PKG_CONFIG_PATH
Biến môi trường chỉ dẫn đến thư mục chứa các file ".pc", được dùng bởi chương trình pkg-config, dùng trong quá trình compile thư viện.
Bài viết liên quan:
+ Pkg-config
Tag :
Linux Basic,
Linux PC
Cross compiling the libraries
Bìa viết liên quan:
+ Cross compler
+ Makefile (Part 1)
+ Makefile (Part 2)
+ Cài đặt môi trường làm việc
1. Library configuration
Trong bài viết này hướng dẫn compile/cross compiling thư viện taglib-1.6.3 (thư viện có chức năng lấy thông tin meta-data của file nhạc) để minh họa cho dễ hiểu. Yêu cầu để thực hiện được phần này thì ít nhất phải biến cách sử dụng máy tính Linux Fedora, biết các command cơ bản trên terminal, biết phân quyền trong Linux, xem lại các bài viết trong mục Linux PC và Linux Basic nếu bạn chưa rõ.
Một số thuật ngữ:
+ Compile: compile thư viện cho host
+ Cross compiling: compile thư viện cho target (board nhúng), ở blog này sử dụng board nhúng Linux là FriendlyARM Mini2440
+ Build: tương đương với compile / cross compiling
Thư viện được cung cấp dưới dạng source code C/C++ và một shell script đi kèm có tên configure dùng để cài đặt các options phụ vụ cho việc build thư viện, file configure này có thể mở được bằng các text editor thông thường như gedit, geany. Sau khi cấu hình xong với configure thì sẽ thu được một Makefile, từ đó dùng lệnh make để build thư viện. Kết quả thu được sau khi build xong thư viện thường có cấu trúc thư mục như sau:
Để bắt đầu bạn download taglib-1.6.3 (có thể tải các version khác ngoài 1.6.3), sau đó giải nén, chuyển terminal vào thư mục taglib-1.6.3 vừa giải nén, chạy lệnh ./configure --help để xem hướng dẫn build thư viện:
./configure --help
1.1 Configuration
Các options để show thông tin về thư viện, ví dụ:
1.2 Installation directories
Thư mục để install thư viện vào đó:
hoặc
Nếu không cài đặt --prefix thì mặc định nó sẽ install vào thư mục /usr/local
--exec-prefix : mặc định được gán với PREFIX, giống với --prefix
1.3 Fine tuning of the installation directories
Các thư mục sẽ được tạo ra để chứa thư viện: bin, include, lib, etc, ...
Mặc định chúng sẽ là thư mục con của --prefix/PREFIX đã đươc đặt ở bước (2)
1.4 Program names
Không cần quan tâm
1.5 System types
Các options rất quan trong để compile cho host hoặc cross-compiling cho target (board nhúng), nếu bạn compile cho host, bạn không cần cài đặt các options này, nếu bạn cross-compiling cho target bạn cài đặt như sau:
hoặc
+ HOST
Là nơi mà chương trình sẽ chạy, trong ví dụ trên là board nhúng chạy chíp ARM
+BUILD
Là nơi mà chương trình compiler chạy, hoặc được build ra, ở đây là máy tính chạy chip Inter x86/64bits
+TARGET
Tương tự như HOST, thông số này không cần đặt
1.6 Optional Features
Các options có tiền tố --enable / --disable để cấu hình bật / tắt một tính năng nào đó của thư viện. Các tính năng này được cấu hình mặc định default=yes hoặc default=no ghi rõ trong phần chú thích, nhưng thông thường thì option thuộc dạng --enable thì mặc định là no, option dạng --disable thì mặc định là yes.
Ví dụ:
+ Tắt debug (default=yes)
+ Tắt warning (default=yes)
+ Không build thư viện static (default=no, cho thêm vào cho chắc :D)
+ Bật support MP4 (default=no)
Có rất nhiều options, bạn nên xem kỹ để lựa chọn enable/disable những options cần quan tâm, cái nào không quan tâm cứ để mặc định, thông thường bạn để tất cả chúng mặc định là đã ok rồi.
1.7 Optional Packages
Options này gần giống với --enable
1.8 Some influential environment variables
Ở đây là các biến môi trường sử dụng bởi compiler
+ CFLAGS / CXXFLAGS / CPPFLAGS
C/C++ compiler flags được pass vào cho compiler, bao gồm:
- Đường dẫn header file của thư viện phụ thuộc (nếu có), có dạng -I/path/to/include
Thư viện phụ thuộc: A là thư viện phụ thuộc của B nếu trong B có sử dụng các API do A cung cấp, vì thế A phải được build trước thì mới có thể build B được, vì thế -I/path/to/include có tác dụng cung cấp các API của A cho B trong quá trình compile ra object file.
- Các options riêng của compiler, ví dụ: -Wll, -g
+ CC / CXX / CPP
C compiler và C++ compiler
+ LDFLAGS
Linker flags, gồm các thông tin:
- Đường dẫn đến thư mục chứa thư viện phụ thuộc (.la, .so), có dạng -L/path/to/lib
- Các thư viện sẽ dùng, có dạng -l<name>; ví dụ: -ltag tương ứng với libtag
+ LIBS
Tương tự như phần "Các thư viện sẽ dùng" trong LDFLAGS, thông thường LIBS ít được dùng vì nó đã được bao hàm trong LDFLAGS
Ex:
hoặc
Note:
PATH: là biến môi trường chỉ ra đường dẫn đến file nhị phân của compiler
2. Compile taglib-1.6.3 for Linux Fedora x86_64
./configure: cấu hình mặc định, có chỉ ra thư mục để install, sau bước này sẽ có được Makefile
make
make install

tagreader_c.c (chương trình ví dụ có sử dụng thư viện taglib vừa build xong)
Makefile (Makefile cho ví dụ tagreader_c.c)
Make (Build application, cần có các biến môi trường để chỉ dẫn đến thư viện là PATH và LD_LIBRARY_PATH)
Execute (Cũng cần có biến môi trường như khi buil app)
3. Cross compiling taglib-1.6.3 for Friendlyarm mini2440
Phần build sẽ thực hiện trên máy tính (host), còn khi chạy chương trình thì trên board nhúng. Các command sẽ được biểu diễn ngắn gọn vì nó tương tự như trên mục 2.
Nếu bạn không có board nhúng thì bạn chỉ cần thực hiện xong bước build là ok rồi.
Trước hết, download toolchain cho board Friendlyarm Mini2440 arm-linux-gcc; giải nén, copy thư mục FriendlyARM vào thư mục /opt.
Build taglib (on Host)

tagreader_c.c (như mục 2)
Makefile
Build application (on Host)
Execute application (on board - Friendlyarm mini2440)
Để thực hiện được bước này, bạn cần biết cách setup board Mini2440 kết nối với máy tính như thế nào, điều khiển board qua chương trình minicom, bước này chỉ có ý nghĩ khi bạn đã xem các hướng dẫn trong phần FriendlyARM, nếu bạn chưa biết thì tạm thời tạm không thực hiện bước này.
Copy toàn bộ thư viện, file app, file nhạc để test vào thư mục taglib trên SDCARD. Khi Mini2440 hoạt động, SDCARD sẽ được mount vào thư mục /sdcard, vì vậy thư mục taglib trên SDCARD sẽ có đường dẫn là /sdcard/taglib

Note: Biến môi trường PATH và LD_LIBRARY_PATH là cực kỳ quan trọng, chúng luôn phải được sử dụng trong tất cả các quá trình từ build library, build application đến khi execute chương trình.
+ Cross compler
+ Makefile (Part 1)
+ Makefile (Part 2)
+ Cài đặt môi trường làm việc
1. Library configuration
Trong bài viết này hướng dẫn compile/cross compiling thư viện taglib-1.6.3 (thư viện có chức năng lấy thông tin meta-data của file nhạc) để minh họa cho dễ hiểu. Yêu cầu để thực hiện được phần này thì ít nhất phải biến cách sử dụng máy tính Linux Fedora, biết các command cơ bản trên terminal, biết phân quyền trong Linux, xem lại các bài viết trong mục Linux PC và Linux Basic nếu bạn chưa rõ.
Một số thuật ngữ:
+ Compile: compile thư viện cho host
+ Cross compiling: compile thư viện cho target (board nhúng), ở blog này sử dụng board nhúng Linux là FriendlyARM Mini2440
+ Build: tương đương với compile / cross compiling
Thư viện được cung cấp dưới dạng source code C/C++ và một shell script đi kèm có tên configure dùng để cài đặt các options phụ vụ cho việc build thư viện, file configure này có thể mở được bằng các text editor thông thường như gedit, geany. Sau khi cấu hình xong với configure thì sẽ thu được một Makefile, từ đó dùng lệnh make để build thư viện. Kết quả thu được sau khi build xong thư viện thường có cấu trúc thư mục như sau:
 bin         #chứa các file execute nhị phân (tương tự file .exe bên Windows)
 etc         #chứa các file cấu hình (vd: file.conf)
 include     #chứa các file header để include vào các chương trình
              có sử dụng thư viện này (vd: tag.h)
 lib         #chứa các file thư viện tĩnh/động .la/.so, cùng với header file để phục vụ
              cho các chương trình khác có sử dụng thư viện này (vd: libtag.la, libtag.so)
 man         #chứa các file tài liệu / hướng dẫn sử dụng dạng text
 share       #chứa nhiều loại file như hướng dẫn / script / media, ...
 ...
Để bắt đầu bạn download taglib-1.6.3 (có thể tải các version khác ngoài 1.6.3), sau đó giải nén, chuyển terminal vào thư mục taglib-1.6.3 vừa giải nén, chạy lệnh ./configure --help để xem hướng dẫn build thư viện:
./configure --help
 [ninhld@localhost taglib-1.6.3]$ ./configure --help
 `configure' configures this package to adapt to many kinds of systems.

 Usage: ./configure [OPTION]... [VAR=VALUE]...

 To assign environment variables (e.g., CC, CFLAGS...), specify them as
 VAR=VALUE. See below for descriptions of some of the useful variables.

 Defaults for the options are specified in brackets.

 Configuration:  (1)
  -h, --help       display this help and exit
    --help=short    display options specific to this package
    --help=recursive  display the short help of all the included packages
  -V, --version      display version information and exit
  -q, --quiet, --silent  do not print `checking...' messages
    --cache-file=FILE  cache test results in FILE [disabled]
  -C, --config-cache   alias for `--cache-file=config.cache'
  -n, --no-create     do not create output files
    --srcdir=DIR    find the sources in DIR [configure dir or `..']

 Installation directories:  (2)
  --prefix=PREFIX     install architecture-independent files in PREFIX
              [/usr/local]
  --exec-prefix=EPREFIX  install architecture-dependent files in EPREFIX
              [PREFIX]

 By default, `make install' will install all the files in
 `/usr/local/bin', `/usr/local/lib' etc. You can specify
 an installation prefix other than `/usr/local' using `--prefix',
 for instance `--prefix=$HOME'.

 For better control, use the options below.

 Fine tuning of the installation directories:  (3)
  --bindir=DIR      user executables [EPREFIX/bin]
  --sbindir=DIR      system admin executables [EPREFIX/sbin]
  --libexecdir=DIR    program executables [EPREFIX/libexec]
  --sysconfdir=DIR    read-only single-machine data [PREFIX/etc]
  --sharedstatedir=DIR  modifiable architecture-independent data [PREFIX/com]
  --localstatedir=DIR   modifiable single-machine data [PREFIX/var]
  --libdir=DIR      object code libraries [EPREFIX/lib]
  --includedir=DIR    C header files [PREFIX/include]
  --oldincludedir=DIR   C header files for non-gcc [/usr/include]
  --datarootdir=DIR    read-only arch.-independent data root [PREFIX/share]
  --datadir=DIR      read-only architecture-independent data [DATAROOTDIR]
  --infodir=DIR      info documentation [DATAROOTDIR/info]
  --localedir=DIR     locale-dependent data [DATAROOTDIR/locale]
  --mandir=DIR      man documentation [DATAROOTDIR/man]
  --docdir=DIR      documentation root [DATAROOTDIR/doc/PACKAGE]
  --htmldir=DIR      html documentation [DOCDIR]
  --dvidir=DIR      dvi documentation [DOCDIR]
  --pdfdir=DIR      pdf documentation [DOCDIR]
  --psdir=DIR       ps documentation [DOCDIR]

 Program names:  (4)
  --program-prefix=PREFIX      prepend PREFIX to installed program names
  --program-suffix=SUFFIX      append SUFFIX to installed program names
  --program-transform-name=PROGRAM  run sed PROGRAM on installed program names

 System types:  (*5)
  --build=BUILD   configure for building on BUILD [guessed]
  --host=HOST    cross-compile to build programs to run on HOST [BUILD]
  --target=TARGET  configure for building compilers for TARGET [HOST]

 Optional Features:  (6)
  --disable-option-checking ignore unrecognized --enable/--with options
  --disable-FEATURE    do not include FEATURE (same as --enable-FEATURE=no)
  --enable-FEATURE[=ARG] include FEATURE [ARG=yes]
  --disable-fast-perl   disable fast Makefile generation (needs perl)
  --enable-debug=ARG   enables debug symbols (yes|no|full) default=no
  --disable-debug     disables debug output and debug symbols default=no
  --enable-strict     compiles with strict compiler options (may not
              work!)
  --disable-warnings   disables compilation with -Wall and similar
  --enable-profile    creates profiling infos default=no
  --disable-dependency-tracking speeds up one-time build
  --enable-dependency-tracking  do not reject slow dependency extractors
  --enable-pch      enables precompiled header support (currently only
              KCC or gcc >=3.4+unsermake) default=no
  --enable-coverage    use gcc coverage testing
  --enable-new-ldflags  enable the new linker flags
  --enable-final     build size optimized apps (experimental - needs lots
              of memory)
  --enable-closure    delay template instantiation
  --enable-nmcheck    enable automatic namespace cleanness check
  --enable-shared[=PKGS] build shared libraries [default=yes]
  --enable-static[=PKGS] build static libraries [default=no]
  --enable-libsuffix   /lib directory suffix (64,32,none,auto=default)
  --enable-fast-install[=PKGS]
              optimize for fast installation [default=yes]
  --disable-libtool-lock avoid locking (might break parallel builds)
  --enable-mp4      add MP4 support
  --enable-asf      add ASF support

 Optional Packages:  (7)
  --with-PACKAGE[=ARG]  use PACKAGE [ARG=yes]
  --without-PACKAGE    do not use PACKAGE (same as --with-PACKAGE=no)
  --with-gnu-ld      assume the C compiler uses GNU ld [default=no]
  --with-pic       try to use only PIC/non-PIC objects [default=use
              both]
  --with-tags[=TAGS]   include additional configurations [automatic]

 Some influential environment variables:  (*8)
  CC     C compiler command
  CFLAGS   C compiler flags
  LDFLAGS   linker flags, e.g. -L<lib dir> if you have libraries in a
        nonstandard directory <lib dir>
  LIBS    libraries to pass to the linker, e.g. -l<library>
  CPPFLAGS  C/C++/Objective C preprocessor flags, e.g. -I<include dir> if
        you have headers in a nonstandard directory <include dir>
  CPP     C preprocessor
  CXX     C++ compiler command
  CXXFLAGS  C++ compiler flags
  CXXCPP   C++ preprocessor
  F77     Fortran 77 compiler command
  FFLAGS   Fortran 77 compiler flags

 Use these variables to override the choices made by `configure' or to help
 it to find libraries and programs with nonstandard names/locations.

 [ninhld@localhost taglib-1.6.3]$
1.1 Configuration
Các options để show thông tin về thư viện, ví dụ:
 configure --help hoặc configure -h
 configure --version hoặc configure -V
1.2 Installation directories
Thư mục để install thư viện vào đó:
 export PREFIX=/home/ninhld/Documents/taglib_install   #export biến môi trường
 ./configure --prefix=$PREFIX
hoặc
./configure --prefix=/home/ninhld/Documents/taglib_install
Nếu không cài đặt --prefix thì mặc định nó sẽ install vào thư mục /usr/local
--exec-prefix : mặc định được gán với PREFIX, giống với --prefix
1.3 Fine tuning of the installation directories
  --bindir=DIR   user executables [EPREFIX/bin]
  --sbindir=DIR   system admin executables [EPREFIX/sbin]
  --libexecdir=DIR  program executables [EPREFIX/libexec]
  --sysconfdir=DIR  read-only single-machine data [PREFIX/etc]
  ...
Các thư mục sẽ được tạo ra để chứa thư viện: bin, include, lib, etc, ...
Mặc định chúng sẽ là thư mục con của --prefix/PREFIX đã đươc đặt ở bước (2)
1.4 Program names
Không cần quan tâm
1.5 System types
Các options rất quan trong để compile cho host hoặc cross-compiling cho target (board nhúng), nếu bạn compile cho host, bạn không cần cài đặt các options này, nếu bạn cross-compiling cho target bạn cài đặt như sau:
 export HOST=arm-none-linux-gnueabi
 export BUILD=x86_64
 ./configure --build=${BUILD} --host=${HOST}
hoặc
./configure --build=x86_64 --host=arm-none-linux-gnueabi
+ HOST
Là nơi mà chương trình sẽ chạy, trong ví dụ trên là board nhúng chạy chíp ARM
+BUILD
Là nơi mà chương trình compiler chạy, hoặc được build ra, ở đây là máy tính chạy chip Inter x86/64bits
+TARGET
Tương tự như HOST, thông số này không cần đặt
1.6 Optional Features
Các options có tiền tố --enable / --disable để cấu hình bật / tắt một tính năng nào đó của thư viện. Các tính năng này được cấu hình mặc định default=yes hoặc default=no ghi rõ trong phần chú thích, nhưng thông thường thì option thuộc dạng --enable thì mặc định là no, option dạng --disable thì mặc định là yes.
Ví dụ:
./configure --disable-debug --disable-warnings --enable-static=no --enable-mp4
+ Tắt debug (default=yes)
+ Tắt warning (default=yes)
+ Không build thư viện static (default=no, cho thêm vào cho chắc :D)
+ Bật support MP4 (default=no)
Có rất nhiều options, bạn nên xem kỹ để lựa chọn enable/disable những options cần quan tâm, cái nào không quan tâm cứ để mặc định, thông thường bạn để tất cả chúng mặc định là đã ok rồi.
1.7 Optional Packages
Options này gần giống với --enable
1.8 Some influential environment variables
Ở đây là các biến môi trường sử dụng bởi compiler
+ CFLAGS / CXXFLAGS / CPPFLAGS
C/C++ compiler flags được pass vào cho compiler, bao gồm:
- Đường dẫn header file của thư viện phụ thuộc (nếu có), có dạng -I/path/to/include
Thư viện phụ thuộc: A là thư viện phụ thuộc của B nếu trong B có sử dụng các API do A cung cấp, vì thế A phải được build trước thì mới có thể build B được, vì thế -I/path/to/include có tác dụng cung cấp các API của A cho B trong quá trình compile ra object file.
- Các options riêng của compiler, ví dụ: -Wll, -g
+ CC / CXX / CPP
C compiler và C++ compiler
 #x86
 CC=gcc
 CXX=g++
 CPP=g++

 hoặc
 #arm
 CC=arm-none-linux-gnueabi-gcc
 CXX=arm-none-linux-gnueabi-g++
 CPP=arm-none-linux-gnueabi-g++
+ LDFLAGS
Linker flags, gồm các thông tin:
- Đường dẫn đến thư mục chứa thư viện phụ thuộc (.la, .so), có dạng -L/path/to/lib
- Các thư viện sẽ dùng, có dạng -l<name>; ví dụ: -ltag tương ứng với libtag
+ LIBS
Tương tự như phần "Các thư viện sẽ dùng" trong LDFLAGS, thông thường LIBS ít được dùng vì nó đã được bao hàm trong LDFLAGS
Ex:
#export biến môi trường export CC_PATH=/opt/FriendlyARM/toolschain/4.4.3
export CROSS_COMPILE=${CC_PATH}/bin/arm-none-linux-gnueabi-
export PATH=$PATH:${CC_PATH}/bin
export CC=${CROSS_COMPILE}gcc
export CXX=${CROSS_COMPILE}g++
export CFLAGS+="-I/friendlyarm/usr/local/include -DDEBUG -Wall -g"
export CXXFLAGS=$CFLAGS
export LDFLAGS+="-L/friendlyarm/usr/local/lib -lm"
./configure
hoặc
 export CC_PATH=/opt/FriendlyARM/toolschain/4.4.3
 export CROSS_COMPILE=${CC_PATH}/bin/arm-none-linux-gnueabi-
 export PATH=$PATH:${CC_PATH}/bin
 #nhúng các flags vào thẳng configure
 ./configure CC=${CROSS_COMPILE}gcc CXX=${CROSS_COMPILE}g++ \
 CFLAGS="-I/friendlyarm/usr/local/include -Wall -g" \
 CXXFLAGS=$CFLAGS LDFLAGS="-L/friendlyarm/usr/local/lib -lm"
Note:
PATH: là biến môi trường chỉ ra đường dẫn đến file nhị phân của compiler
2. Compile taglib-1.6.3 for Linux Fedora x86_64
./configure: cấu hình mặc định, có chỉ ra thư mục để install, sau bước này sẽ có được Makefile
 [ninhld@localhost taglib-1.6.3]$
 [ninhld@localhost taglib-1.6.3]$ export PREFIX=/home/ninhld/Documents/taglib_install
 [ninhld@localhost taglib-1.6.3]$ ./configure --prefix=$PREFIX
 checking build system type... x86_64-unknown-linux-gnu
 checking host system type... x86_64-unknown-linux-gnu
 checking target system type... x86_64-unknown-linux-gnu
 ...
 ...
 config.status: creating Makefile
 config.status: creating bindings/Makefile
 config.status: creating bindings/c/Makefile
 config.status: creating examples/Makefile
 config.status: creating taglib/Makefile
 config.status: creating taglib/ape/Makefile
 config.status: creating taglib/asf/Makefile
 config.status: creating taglib/flac/Makefile
 config.status: creating taglib/mp4/Makefile
 config.status: creating taglib/mpc/Makefile
 config.status: creating taglib/mpeg/Makefile
 config.status: creating taglib/mpeg/id3v1/Makefile
 config.status: creating taglib/mpeg/id3v2/Makefile
 config.status: creating taglib/mpeg/id3v2/frames/Makefile
 config.status: creating taglib/ogg/Makefile
 config.status: creating taglib/ogg/flac/Makefile
 config.status: creating taglib/ogg/speex/Makefile
 config.status: creating taglib/ogg/vorbis/Makefile
 config.status: creating taglib/riff/Makefile
 config.status: creating taglib/riff/aiff/Makefile
 config.status: creating taglib/riff/wav/Makefile
 config.status: creating taglib/toolkit/Makefile
 config.status: creating taglib/trueaudio/Makefile
 config.status: creating taglib/wavpack/Makefile
 config.status: creating tests/Makefile
 config.status: creating taglib-config
 config.status: creating taglib.pc
 config.status: creating bindings/c/taglib_c.pc
 config.status: creating config.h
 config.status: creating taglib/taglib_config.h
 config.status: executing depfiles commands

 Good - your configure finished. Start make now

 [ninhld@localhost taglib-1.6.3]$
make
 [ninhld@localhost taglib-1.6.3]$
 [ninhld@localhost taglib-1.6.3]$ make
 make all-recursive
 make[1]: Entering directory `/home/ninhld/Documents/taglib-1.6.3'
 Making all in taglib
 make[2]: Entering directory `/home/ninhld/Documents/taglib-1.6.3/taglib'
 make all-recursive
 make[3]: Entering directory `/home/ninhld/Documents/taglib-1.6.3/taglib'
 Making all in toolkit
 make[4]: Entering directory `/home/ninhld/Documents/taglib-1.6.3/taglib/toolkit'
 /bin/sh ../../libtool --silent --tag=CXX  --mode=compile g++ -DMAKE_TAGLIB_LIB -DHAVE_CONFIG_H -I. -I../.. -I../../taglib -I../../taglib   -O2 -fno-exceptions -fno-check-new -fno-common -fexceptions -MT tstring.lo -MD -MP -MF .deps/tstring.Tpo -c -o tstring.lo tstring.cpp
 ..
 ...
 make[3]: Leaving directory `/home/ninhld/Documents/taglib-1.6.3/bindings/c'
 make[3]: Entering directory `/home/ninhld/Documents/taglib-1.6.3/bindings'
 make[3]: Nothing to be done for `all-am'.
 make[3]: Leaving directory `/home/ninhld/Documents/taglib-1.6.3/bindings'
 make[2]: Leaving directory `/home/ninhld/Documents/taglib-1.6.3/bindings'
 Making all in tests
 make[2]: Entering directory `/home/ninhld/Documents/taglib-1.6.3/tests'
 make[2]: Nothing to be done for `all'.
 make[2]: Leaving directory `/home/ninhld/Documents/taglib-1.6.3/tests'
 make[2]: Entering directory `/home/ninhld/Documents/taglib-1.6.3'
 make[2]: Leaving directory `/home/ninhld/Documents/taglib-1.6.3'
 make[1]: Leaving directory `/home/ninhld/Documents/taglib-1.6.3'
 [ninhld@localhost taglib-1.6.3]$
 [ninhld@localhost taglib-1.6.3]$
make install
 [ninhld@localhost taglib-1.6.3]$ make install
 Making install in taglib
 make[1]: Entering directory `/home/ninhld/Documents/taglib-1.6.3/taglib'
 Making install in toolkit
 make[2]: Entering directory `/home/ninhld/Documents/taglib-1.6.3/taglib/toolkit'
 make[3]: Entering directory `/home/ninhld/Documents/taglib-1.6.3/taglib/toolkit'
 make[3]: Nothing to be done for `install-exec-am'.
 test -z "/home/ninhld/Documents/taglib_install/include/taglib" || /usr/bin/mkdir -p "/home/ninhld/Documents/taglib_install/include/taglib"
  /usr/bin/install -c -p -m 644 'taglib.h' '/home/ninhld/Documents/taglib_install/include/taglib/taglib.h'
  /usr/bin/install -c -p -m 644 'tstring.h' '/home/ninhld/Documents/taglib_install/include/taglib/tstring.h'
  /usr/bin/install -c -p -m 644 'tlist.h' '/home/ninhld/Documents/taglib_install/include/taglib/tlist.h'
  /usr/bin/install -c -p -m 644 'tlist.tcc' '/home/ninhld/Documents/taglib_install/include/taglib/tlist.tcc'
  /usr/bin/install -c -p -m 644 'tstringlist.h' '/home/ninhld/Documents/taglib_install/include/taglib/tstringlist.h'
  /usr/bin/install -c -p -m 644 'tbytevector.h' '/home/ninhld/Documents/taglib_install/include/taglib/tbytevector.h'
  /usr/bin/install -c -p -m 644 'tbytevectorlist.h' '/home/ninhld/Documents/taglib_install/include/taglib/tbytevectorlist.h'
  /usr/bin/install -c -p -m 644 'tfile.h' '/home/ninhld/Documents/taglib_install/include/taglib/tfile.h'
  /usr/bin/install -c -p -m 644 'tmap.h' '/home/ninhld/Documents/taglib_install/include/taglib/tmap.h'
  /usr/bin/install -c -p -m 644 'tmap.tcc' '/home/ninhld/Documents/taglib_install/include/taglib/tmap.tcc'
 make[3]: Leaving directory `/home/ninhld/Documents/taglib-1.6.3/taglib/toolkit'
 make[2]: Leaving directory `/home/ninhld/Documents/taglib-1.6.3/taglib/toolkit'
 Making install in mpeg
 ...
 ...
  /usr/bin/install -c -p -m 644 'taglib.pc' '/home/ninhld/Documents/taglib_install/lib64/pkgconfig/taglib.pc'
 make[2]: Leaving directory `/home/ninhld/Documents/taglib-1.6.3'
 make[1]: Leaving directory `/home/ninhld/Documents/taglib-1.6.3'
 [ninhld@localhost taglib-1.6.3]$
tagreader_c.c (chương trình ví dụ có sử dụng thư viện taglib vừa build xong)
 /* Copyright (C) 2003 Scott Wheeler <wheeler@kde.org>
  *
  * Redistribution and use in source and binary forms, with or without
  * modification, are permitted provided that the following conditions
  * are met:
  *
  * 1. Redistributions of source code must retain the above copyright
  *  notice, this list of conditions and the following disclaimer.
  * 2. Redistributions in binary form must reproduce the above copyright
  *  notice, this list of conditions and the following disclaimer in the
  *  documentation and/or other materials provided with the distribution.
  *
  * THIS SOFTWARE IS PROVIDED BY THE AUTHOR ``AS IS'' AND ANY EXPRESS OR
  * IMPLIED WARRANTIES, INCLUDING, BUT NOT LIMITED TO, THE IMPLIED WARRANTIES
  * OF MERCHANTABILITY AND FITNESS FOR A PARTICULAR PURPOSE ARE DISCLAIMED.
  * IN NO EVENT SHALL THE AUTHOR BE LIABLE FOR ANY DIRECT, INDIRECT,
  * INCIDENTAL, SPECIAL, EXEMPLARY, OR CONSEQUENTIAL DAMAGES (INCLUDING, BUT
  * NOT LIMITED TO, PROCUREMENT OF SUBSTITUTE GOODS OR SERVICES; LOSS OF USE,
  * DATA, OR PROFITS; OR BUSINESS INTERRUPTION) HOWEVER CAUSED AND ON ANY
  * THEORY OF LIABILITY, WHETHER IN CONTRACT, STRICT LIABILITY, OR TORT
  * (INCLUDING NEGLIGENCE OR OTHERWISE) ARISING IN ANY WAY OUT OF THE USE OF
  * THIS SOFTWARE, EVEN IF ADVISED OF THE POSSIBILITY OF SUCH DAMAGE.
  */

 #include <stdio.h>
 #include <tag_c.h>

 #ifndef FALSE
 #define FALSE 0
 #endif

 int main(int argc, char *argv[])
 {
  int i;
  int seconds;
  int minutes;
  TagLib_File *file;
  TagLib_Tag *tag;
  const TagLib_AudioProperties *properties;

  taglib_set_strings_unicode(FALSE);

  for(i = 1; i < argc; i++) {
   printf("******************** \"%s\" ********************\n", argv[i]);

   file = taglib_file_new(argv[i]);

   if(file == NULL)
    break;

   tag = taglib_file_tag(file);
   properties = taglib_file_audioproperties(file);

   if(tag != NULL) {
    printf("-- TAG --\n");
    printf("title  - \"%s\"\n", taglib_tag_title(tag));
    printf("artist - \"%s\"\n", taglib_tag_artist(tag));
    printf("album  - \"%s\"\n", taglib_tag_album(tag));
    printf("year  - \"%i\"\n", taglib_tag_year(tag));
    printf("comment - \"%s\"\n", taglib_tag_comment(tag));
    printf("track  - \"%i\"\n", taglib_tag_track(tag));
    printf("genre  - \"%s\"\n", taglib_tag_genre(tag));
   }

   if(properties != NULL) {
    seconds = taglib_audioproperties_length(properties) % 60;
    minutes = (taglib_audioproperties_length(properties) - seconds) / 60;

    printf("-- AUDIO --\n");
    printf("bitrate   - %i\n", taglib_audioproperties_bitrate(properties));
    printf("sample rate - %i\n", taglib_audioproperties_samplerate(properties));
    printf("channels  - %i\n", taglib_audioproperties_channels(properties));
    printf("length   - %i:%02i\n", minutes, seconds);
   }

   taglib_tag_free_strings();
   taglib_file_free(file);
  }

  return 0;
 }
Makefile (Makefile cho ví dụ tagreader_c.c)
 .PHONY: all, install, clean

 TARGET:=tagreader

 HDRS+=
 CSRCS+= tagreader_c.c
 CPPSRCS+=

 OBJSDIR=./build
 OBJS:= $(patsubst %.cpp, $(OBJSDIR)/%.o, $(CPPSRCS))
 OBJS+= $(patsubst %.c, $(OBJSDIR)/%.o, $(CSRCS))


 INCDIR+= -I/home/ninhld/Documents/taglib_install/include \
      -I/home/ninhld/Documents/taglib_install/include/taglib
 CFLAGS += -DDEBUG -Wall -g
 LDFLAGS += -L/home/ninhld/Documents/taglib_install/lib64 -ltag -ltag_c

 CC:= gcc
 CXX:= g++

 all: ${TARGET}
 ${TARGET} : $(OBJS)
      @echo " [LINK] $@"
      @mkdir -p $(shell dirname $@)
      @$(CXX) $(OBJS) -o $@ $(LDFLAGS)

 $(OBJSDIR)/%.o: %.c $(HDRS)
      @echo " [CC]  $@"
      @mkdir -p $(shell dirname $@)
      @$(CC) -c $< -o $@ $(CFLAGS) ${INCDIR}

 $(OBJSDIR)/%.o: %.cpp $(HDRS)
      @echo " [CXX] $@"
      @mkdir -p $(shell dirname $@)
      @$(CXX) -c $< -o $@ $(CFLAGS) ${INCDIR}

 install:
      cp -rf ${TARGET} /usr/local/bin

 clean:
      rm -rf ${OBJSDIR}
      rm -rf ${TARGET}
Make (Build application, cần có các biến môi trường để chỉ dẫn đến thư viện là PATH và LD_LIBRARY_PATH)
 [ninhld@localhost examples]$
 [ninhld@localhost examples]$ export TAGLIBDIR=/home/ninhld/Documents/taglib_install
 [ninhld@localhost examples]$ export PATH=$PATH:${TAGLIBDIR}/bin
 [ninhld@localhost examples]$ export LD_LIBRARY_PATH=$LD_LIBRARY_PATH:${TAGLIBDIR}/lib64
 [ninhld@localhost examples]$
 [ninhld@localhost examples]$
 [ninhld@localhost examples]$ make
  [CC]  build/tagreader_c.o
  [LINK] tagreader
 [ninhld@localhost examples]$
 [ninhld@localhost examples]$ ldd tagreader  #kiểm tra các lib được dùng trong chương trình
      linux-vdso.so.1 => (0x00007fff7a8af000)
      libtag.so.1 => /home/ninhld/Documents/taglib_install/lib64/libtag.so.1 (0x00007f72c4eb6000)
      libtag_c.so.0 => /home/ninhld/Documents/taglib_install/lib64/libtag_c.so.0 (0x00007f72c4cb0000)
      libstdc++.so.6 => /lib64/libstdc++.so.6 (0x0000003839a00000)
      libm.so.6 => /lib64/libm.so.6 (0x000000382ae00000)
      libgcc_s.so.1 => /lib64/libgcc_s.so.1 (0x000000382ca00000)
      libc.so.6 => /lib64/libc.so.6 (0x0000003829e00000)
      libz.so.1 => /lib64/libz.so.1 (0x000000382a600000)
      /lib64/ld-linux-x86-64.so.2 (0x0000003829600000)
 [ninhld@localhost examples]$
 [ninhld@localhost examples]$
Execute (Cũng cần có biến môi trường như khi buil app)
 [ninhld@localhost examples]$ export TAGLIBDIR=/home/ninhld/Documents/taglib_install
 [ninhld@localhost examples]$ export PATH=$PATH:${TAGLIBDIR}/bin
 [ninhld@localhost examples]$ export LD_LIBRARY_PATH=$LD_LIBRARY_PATH:${TAGLIBDIR}/lib64
 [ninhld@localhost examples]$
 [ninhld@localhost examples]$ ./tagreader /home/ninhld/Music/hanh_phuc_neu_co_em.mp3
 ******************** "/home/ninhld/Music/hanh_phuc_neu_co_em.mp3" ********************
 -- TAG --
 title  - "Hạnh Phúc Nếu Anh Có Em "
 artist - "Phúc bồ "
 album  - "mp3.zing.vn"
 year  - "0"
 comment - "Zing MP3 - Dinh cao am nhac"
 track  - "0"
 genre  - ""
 -- AUDIO --
 bitrate   - 128
 sample rate - 44100
 channels  - 2
 length   - 3:05
 [ninhld@localhost examples]$
3. Cross compiling taglib-1.6.3 for Friendlyarm mini2440
Phần build sẽ thực hiện trên máy tính (host), còn khi chạy chương trình thì trên board nhúng. Các command sẽ được biểu diễn ngắn gọn vì nó tương tự như trên mục 2.
Nếu bạn không có board nhúng thì bạn chỉ cần thực hiện xong bước build là ok rồi.
Trước hết, download toolchain cho board Friendlyarm Mini2440 arm-linux-gcc; giải nén, copy thư mục FriendlyARM vào thư mục /opt.
Build taglib (on Host)
 export CC_PATH=/opt/FriendlyARM/toolschain/4.4.3
 export PATH=$PATH:${CC_PATH}/bin
 export CROSS_COMPILE=${CC_PATH}/bin/arm-none-linux-gnueabi-
 export CC=${CROSS_COMPILE}gcc
 export HOST=arm-none-linux-gnueabi
 export BUILD=x86_64

 export PREFIX=/home/ninhld/Documents/taglib_install_target
 ./configure --prefix=$PREFIX --build=${BUILD} --host=${HOST}
 make
 make install
tagreader_c.c (như mục 2)
Makefile
 .PHONY: all, install, clean

 TARGET:=tagreader

 HDRS+=
 CSRCS+= tagreader_c.c
 CPPSRCS+=

 OBJSDIR=./build
 OBJS:= $(patsubst %.cpp, $(OBJSDIR)/%.o, $(CPPSRCS))
 OBJS+= $(patsubst %.c, $(OBJSDIR)/%.o, $(CSRCS))


 INCDIR+= -I/home/ninhld/Documents/taglib_install_target/include \
      -I/home/ninhld/Documents/taglib_install_target/include/taglib
 CFLAGS += -DDEBUG -Wall -g
 LDFLAGS += -L/home/ninhld/Documents/taglib_install_target/lib -ltag -ltag_c

 CC=${CROSS_COMPILE}gcc
 CXX=${CROSS_COMPILE}g++

 all: ${TARGET}
 ${TARGET} : $(OBJS)
      @echo " [LINK] $@"
      @mkdir -p $(shell dirname $@)
      @$(CXX) $(OBJS) -o $@ $(LDFLAGS)

 $(OBJSDIR)/%.o: %.c $(HDRS)
      @echo " [CC]  $@"
      @mkdir -p $(shell dirname $@)
      @$(CC) -c $< -o $@ $(CFLAGS) ${INCDIR}

 $(OBJSDIR)/%.o: %.cpp $(HDRS)
      @echo " [CXX] $@"
      @mkdir -p $(shell dirname $@)
      @$(CXX) -c $< -o $@ $(CFLAGS) ${INCDIR}

 install:
      cp -rf ${TARGET} /usr/local/bin

 clean:
      rm -rf ${OBJSDIR}
      rm -rf ${TARGET}
Build application (on Host)
 export TAGLIBDIR=/home/ninhld/Documents/taglib_install_target
 export PATH=$PATH:${TAGLIBDIR}/bin
 export LD_LIBRARY_PATH=$LD_LIBRARY_PATH:${TAGLIBDIR}/lib
 make
Execute application (on board - Friendlyarm mini2440)
Để thực hiện được bước này, bạn cần biết cách setup board Mini2440 kết nối với máy tính như thế nào, điều khiển board qua chương trình minicom, bước này chỉ có ý nghĩ khi bạn đã xem các hướng dẫn trong phần FriendlyARM, nếu bạn chưa biết thì tạm thời tạm không thực hiện bước này.
Copy toàn bộ thư viện, file app, file nhạc để test vào thư mục taglib trên SDCARD. Khi Mini2440 hoạt động, SDCARD sẽ được mount vào thư mục /sdcard, vì vậy thư mục taglib trên SDCARD sẽ có đường dẫn là /sdcard/taglib
 export TAGLIBDIR=/sdcard/taglib
 export PATH=$PATH:${TAGLIBDIR}/bin
 export LD_LIBRARY_PATH=$LD_LIBRARY_PATH:${TAGLIBDIR}/lib

 cd /sdcard/taglib
 ./tagreader /sdcard/taglib/hanh_phuc_neu_co_em.mp3

******************** "/sdcard/taglib/hanh_phuc_neu_co_em.mp3" ********************
-- TAG --
title   - "H�á�º�¡nh Ph�Ã�ºc N�á�º�¿u Anh C�Ã�³ Em "
artist  - "Ph�Ã�ºc b�á�»��“ "
album   - "mp3.zing.vn"
year    - "0"
comment - "Zing MP3 - Dinh cao am nhac"
track   - "0"
genre   - ""
-- AUDIO --
bitrate     - 128
sample rate - 44100
channels    - 2
length      - 3:05
Note: Biến môi trường PATH và LD_LIBRARY_PATH là cực kỳ quan trọng, chúng luôn phải được sử dụng trong tất cả các quá trình từ build library, build application đến khi execute chương trình.
Display message or driver message - dmesg

Lệnh dmesg sẽ trace ra rất nhiều thông tin từ lúc hệ thống khởi động cho đến thời điểm hiện tại, các thông tin có thể là về kernel, device driver, ... hoặc các thành phần phần cứng.
 [ninhld@localhost docs]$ dmesg
 [  0.000000] Initializing cgroup subsys cpuset
 [  0.000000] Initializing cgroup subsys cpu
 [  0.000000] Initializing cgroup subsys cpuacct
 [  0.000000] Linux version 3.18.6-100.fc20.x86_64 (mockbuild@bkernel02.phx2.fedoraproject.org) (gcc version 4.8.3 20140911 (Red Hat 4.8.3-7) (GCC) ) #1 SMP Fri Feb 6 22:55:01 UTC 2015
 [  0.000000] Command line: BOOT_IMAGE=/vmlinuz-3.18.6-100.fc20.x86_64 root=UUID=e1f37513-df0d-4ca7-9ec4-c4c9987dbe60 ro vconsole.font=latarcyrheb-sun16 rhgb quiet LANG=en_US.UTF-8
 [  0.000000] Disabled fast string operations
 [  0.000000] e820: BIOS-provided physical RAM map:
 [  0.000000] BIOS-e820: [mem 0x0000000000000000-0x000000000009d7ff] usable
 [  0.000000] BIOS-e820: [mem 0x000000000009d800-0x000000000009ffff] reserved
 [  0.000000] BIOS-e820: [mem 0x00000000000e0000-0x00000000000fffff] reserved
 [  0.000000] BIOS-e820: [mem 0x0000000000100000-0x00000000da99efff] usable
 [  0.000000] BIOS-e820: [mem 0x00000000da99f000-0x00000000dae9efff] reserved
 [  0.000000] BIOS-e820: [mem 0x00000000dae9f000-0x00000000daf9efff] ACPI NVS
 [  0.000000] BIOS-e820: [mem 0x00000000daf9f000-0x00000000daffefff] ACPI data
 [  0.000000] BIOS-e820: [mem 0x00000000dafff000-0x00000000daffffff] usable
 [  0.000000] BIOS-e820: [mem 0x00000000db000000-0x00000000df9fffff] reserved
 [  0.000000] BIOS-e820: [mem 0x00000000f8000000-0x00000000fbffffff] reserved
 [  0.000000] BIOS-e820: [mem 0x00000000fec00000-0x00000000fec00fff] reserved
 [  0.000000] BIOS-e820: [mem 0x00000000fed08000-0x00000000fed08fff] reserved
 [  0.000000] BIOS-e820: [mem 0x00000000fed10000-0x00000000fed19fff] reserved
 [  0.000000] BIOS-e820: [mem 0x00000000fed1c000-0x00000000fed1ffff] reserved
 [  0.000000] BIOS-e820: [mem 0x00000000fee00000-0x00000000fee00fff] reserved
 [  0.000000] BIOS-e820: [mem 0x00000000ffd20000-0x00000000ffffffff] reserved
 [  0.000000] BIOS-e820: [mem 0x0000000100000000-0x000000011e5fffff] usable
 [  0.000000] NX (Execute Disable) protection: active
 [  0.000000] SMBIOS 2.6 present.
 [  0.000000] DMI: LENOVO 4180AD9/4180AD9, BIOS 83ET61WW (1.31 ) 07/07/2011
 [  0.000000] e820: update [mem 0x00000000-0x00000fff] usable ==> reserved
 ...
 [  82.586529] Bluetooth: RFCOMM TTY layer initialized
 [  82.586562] Bluetooth: RFCOMM socket layer initialized
 [  82.587813] Bluetooth: RFCOMM ver 1.11
 [  96.951311] SELinux: initialized (dev proc, type proc), uses genfs_contexts
 [  98.859836] SELinux: initialized (dev proc, type proc), uses genfs_contexts
Bởi vì lệnh dmesg trace thông tin từ dưới kernel nên nó rất hữu ích trong một số trường hợp như:
+ Xem thông tin về peripheral device mới kết nối vào hệ thống
+ Debug kernel khi viết driver (khi viết driver, muốn trace thông tin thì phải dùng lệnh printk, tuy nhiên lệnh in này sẽ không trace trực tiếp ra terminal mà phải dùng lệnh dmesg mới thấy được)
Ex:
Gắn một thiết bị USB-to-COM (dùng với minicom phục vụ debug board nhúng) vào máy tính và dùng lệnh dmesg sẽ được các thông tin như dưới, cái quan trong nhất là biết được device node của thiết bị là /dev/ttyUSB0
 [ 7377.063526] usb 1-1.1: new full-speed USB device number 6 using ehci-pci
 [ 7377.149745] usb 1-1.1: New USB device found, idVendor=067b, idProduct=2303
 [ 7377.149756] usb 1-1.1: New USB device strings: Mfr=1, Product=2, SerialNumber=0
 [ 7377.149762] usb 1-1.1: Product: USB 2.0 To COM Device
 [ 7377.149766] usb 1-1.1: Manufacturer: Prolific Technology Inc.
 [ 7378.264479] usbcore: registered new interface driver pl2303
 [ 7378.264505] usbserial: USB Serial support registered for pl2303
 [ 7378.264534] pl2303 1-1.1:1.0: pl2303 converter detected
 [ 7378.267971] usb 1-1.1: pl2303 converter now attached to ttyUSB0
Xem thêm tại:
+ Link 1
Tag :
Linux Basic,
Linux PC
File permissions
Bài viết liên quan: Users and Groups
1. File permissions
Với mỗi file,thư mục trong Linux, người dùng có thể có quyền r(read), w(write), x(excute).
Thường một normal user có thể không có đủ 3 quyền trên với một số file, thư mục nào đó. Riêng root có tất cả các quyền r, w, x với tất cả các file, thư mục trong hệ thống (dù hệ thống đang ở trạng thái single user hay multi-user).
Với mỗi file, người dùng được xếp vào một trong 3 loại đối tượng:
- Chủ sở hữu file, kí hiệu là u (user).
- Cùng group với nhóm chủ sở hữu file, kí hiệu là g (group). Tất cả các user thuộc nhóm chủ sở hữu file có cùng một quyền với file
- Khác với 2 loại trên, kí hiệu là o (other)


2. Thiết lập chủ sở hữu, nhóm chủ sở hữu
Khi một file được tạo ra thì mặc định chủ sở hữu file chính là user tạo ra file, nhóm chủ sở hữu file là primary group của user tạo ra file. Khi một user copy file X thành file Y thì file Y được coi là user X tạo ra do đó chủ sở hữu, nhóm chủ sở hữu của Y chính là user X, primary group của X. Chỉ có root mới có quyền thay đổi chủ sở hữu của file, ngay cả chủ sở hữu của một file cũng không thể chuyển quyền sở hữu của mình cho người khác. Tuy nhiên chủ sở hữu của file có quyền thay đổi nhóm chủ sở hữu của file. Để thay đổi chủ sở hữu, nhóm chủ sở hữu:
Ex:
User "lan" vừa tạo ra file "document", user "lan" trở thành chủ sở hữu của file "document". Primary group của user "lan" là "lan" trở thành nhóm chủ sở hữu của file "document". Nếu user "lan" muốn chuyển quyền sở hữu sang user "thanh" thì user "lan" cần đăng nhập bằng root và thực hiện lệnh:
Nếu chỉ thay đổi nhóm chủ sở hữu có thể dùng lệnh
Vẫn ở ví dụ trên khi đổi nhóm chủ sở hữu có thể dùng lệnh:
Ex: thay đổi chủ sở hữu, nhóm chủ sở hữu cho thư mục Dir
3. Thay đổi quyền truy cập r,w,x với các đối tượng u,g,o
Ở trên đã đề cập đến 3 loại quyền truy cập đối với file là read, write, execute; cụ thể hơn thì:
- read: quyền đọc file và do đó có thể sao chép lại file. Khi có quyền đọc file thì không có nghĩa là có quyền ghi (sửa đổi) file nhưng vì có thể sao chép lại file nên có thể sửa đổi bản sao chép
- write: quyền ghi file. Chú ý rằng có thể có quyền ghi mà không có quyền đọc một file. Ví dụ: có file text "document.txt". Nếu có quyền đọc và quyền ghi file này thì người dùng có thể dùng trình soạn thảo văn bản vi, emacs,...để hiển thị toàn bộ nội dung file và tìm những chỗ không vừa ý để sửa chữa. Nếu chỉ có quyền ghi file mà không có quyền đọc thì người dùng không thể dùng trình soạn thảo để sửa chữa file nhưng người dùng có thể dùng lệnh cat >> document.txt để ghi thêm vào cuối file hoặc cat > document.txt để ghi đè lên toàn bộ nội dung của file
- execute: quyền thực thi file. Có hai loại file có thể thực thi được là:
(1) file chứa các lệnh máy mà CPU có thể thực thi luôn được, những file kiểu này gọi là executable file
(2) file text chứa các lệnh cần thực hiện, những file kiểu này được gọi là script. Quyền thực thi file độc lập với quyền đọc và ghi file. Ví dụ có file script "Procedure.sh" với quyền thực thi mà không đọc, ghi; người dùng có thể thực thi các lệnh chứa trong file này nhưng không thể mở file ra xem các lệnh đó là gì và cũng không thể thêm bớt, sửa chữa các lệnh trong file này. Việc xóa, đổi tên một file không được quyết định bởi quyền ghi với file đó mà bởi quyền ghi với thư mục chứa filed đó.
Ba quyền read, write, execute cũng được áp dụng với thư mục nhưng ý nghĩa của chúng thì khác hoàn toàn:
- read: quyền đọc một thư mục là quyền liệt kê các file, thư mục con của một thư mục.
- write: quyền ghi một thư mục là quyền tạo mới, xóa, đổi tên file và thư mục con của thư mục. Có thể xảy ra trường hợp: có quyền ghi một file tức là sửa chữa nội dung của file nhưng lại không có quyền đổi tên, xóa file nếu như không có quyền ghi với thư mục chứa file đó.
- execute: quyền thực thi một thư mục là quyền "đi vào" thư mục, chẳng hạn bằng lệnh cd. Có thể xảy ra trường hợp: có quyền thực thi nhưng lại không có quyền đọc một thư mục. Khi đó có thể "cd" một thư mục nhưng lại không thể "ls" nó ra. Khi thư mục không có quyền excute thì không thể truy cập nội dung các file trong thư mục đó.
Ex:
Giả sử user U1 có file FileOfU1 đặt trong /home/U1 muốn chia sẻ với các user khác nên đã đặt quyền r,w cho file. Tuy nhiên bản thân thư mục /home/U1 khi được tạo ra đã bị mặc định là không có quyền excute nên các user khác không thể đọc, ghi file /home/U1/FileOfU1 được.
Chủ sở hữu và root có quyền thay đổi quyền truy cập đối với cả 3 loại đối tượng: chủ sở hữu (user), nhóm chủ sở hữu (group), những user khác không thuộc 2 loại trên (others).
Lệnh thay đổi quyền truy cập:
Có 2 cách biểu diễn <quyền>: bằng kí tự hoặc bằng chữ số
- Cách1: Biểu diễn quyền bằng kí tự: quyền được biểu diễn bằng tổ hợp 3 loại kí tự sau

Ex:
Chú ý: chmod u+r,o+x myfile và chmod u=r,o=x myfile là hai lệnh khác nhau
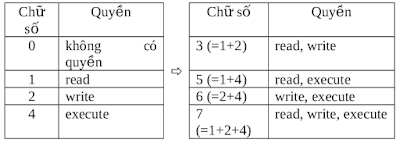
- Cách2: Biểu diễn quyền bằng chữ số octal: dùng 3 chữ số để biểu diễn quyền của 3 loại đối tượng u,g,o. Giá trị mỗi chữ số octal biểu diễn một quyền theo bảng sau:

 Ex:
Ex:
Xem thêm tại:
+ Link 1
1. File permissions
Với mỗi file,thư mục trong Linux, người dùng có thể có quyền r(read), w(write), x(excute).
Thường một normal user có thể không có đủ 3 quyền trên với một số file, thư mục nào đó. Riêng root có tất cả các quyền r, w, x với tất cả các file, thư mục trong hệ thống (dù hệ thống đang ở trạng thái single user hay multi-user).
Với mỗi file, người dùng được xếp vào một trong 3 loại đối tượng:
- Chủ sở hữu file, kí hiệu là u (user).
- Cùng group với nhóm chủ sở hữu file, kí hiệu là g (group). Tất cả các user thuộc nhóm chủ sở hữu file có cùng một quyền với file
- Khác với 2 loại trên, kí hiệu là o (other)
Mỗi loại đối tượng trên sẽ có một số quyền trong 3 quyền r, w, x. Lệnh ls -l cho biết quyền của mỗi loại đối tượng trên theo format như dưới đây:


Ex:
 [ninhld@localhost docs]$ ls -l
 total 14544
 -rwxrwxr-x. 1 ninhld ninhld 1449498 Jun 13 2013   Building Embedded Linux Systems.pdf
 drwxrwxr-x. 2 ninhld ninhld    4096 Jun 23 21:02  mydir
Khi một file được tạo ra thì mặc định chủ sở hữu file chính là user tạo ra file, nhóm chủ sở hữu file là primary group của user tạo ra file. Khi một user copy file X thành file Y thì file Y được coi là user X tạo ra do đó chủ sở hữu, nhóm chủ sở hữu của Y chính là user X, primary group của X. Chỉ có root mới có quyền thay đổi chủ sở hữu của file, ngay cả chủ sở hữu của một file cũng không thể chuyển quyền sở hữu của mình cho người khác. Tuy nhiên chủ sở hữu của file có quyền thay đổi nhóm chủ sở hữu của file. Để thay đổi chủ sở hữu, nhóm chủ sở hữu:
chown [chủ] [.nhóm] <file>chown là viết tắt của "change own"
Ex:
User "lan" vừa tạo ra file "document", user "lan" trở thành chủ sở hữu của file "document". Primary group của user "lan" là "lan" trở thành nhóm chủ sở hữu của file "document". Nếu user "lan" muốn chuyển quyền sở hữu sang user "thanh" thì user "lan" cần đăng nhập bằng root và thực hiện lệnh:
chown thanh documentNếu user "lan" muốn thay đổi nhóm chủ sở hữu từ "lan" sang "ITdepart" thì user "lan" cần đăng nhập bằng root và thực hiện lệnh:
chown .ITdepart documentHai lệnh trên có thể gộp lại thành:
chown thanh.ITdepart document(chú ý dấu chấm viết ngay sau chủ sở hữu mới)
Nếu chỉ thay đổi nhóm chủ sở hữu có thể dùng lệnh
chgrp <nhóm> <file>(chgrp là viết tắt của "changegroup")
Vẫn ở ví dụ trên khi đổi nhóm chủ sở hữu có thể dùng lệnh:
chgrp ITdepart documentKhi thay đổi chủ sở hữu đối với thư mục cần thêm tham số -R
Ex: thay đổi chủ sở hữu, nhóm chủ sở hữu cho thư mục Dir
chown -R .ITdepart Dir
hoặc
chgrp -R ITdepart Dir
Ở trên đã đề cập đến 3 loại quyền truy cập đối với file là read, write, execute; cụ thể hơn thì:
- read: quyền đọc file và do đó có thể sao chép lại file. Khi có quyền đọc file thì không có nghĩa là có quyền ghi (sửa đổi) file nhưng vì có thể sao chép lại file nên có thể sửa đổi bản sao chép
- write: quyền ghi file. Chú ý rằng có thể có quyền ghi mà không có quyền đọc một file. Ví dụ: có file text "document.txt". Nếu có quyền đọc và quyền ghi file này thì người dùng có thể dùng trình soạn thảo văn bản vi, emacs,...để hiển thị toàn bộ nội dung file và tìm những chỗ không vừa ý để sửa chữa. Nếu chỉ có quyền ghi file mà không có quyền đọc thì người dùng không thể dùng trình soạn thảo để sửa chữa file nhưng người dùng có thể dùng lệnh cat >> document.txt để ghi thêm vào cuối file hoặc cat > document.txt để ghi đè lên toàn bộ nội dung của file
- execute: quyền thực thi file. Có hai loại file có thể thực thi được là:
(1) file chứa các lệnh máy mà CPU có thể thực thi luôn được, những file kiểu này gọi là executable file
(2) file text chứa các lệnh cần thực hiện, những file kiểu này được gọi là script. Quyền thực thi file độc lập với quyền đọc và ghi file. Ví dụ có file script "Procedure.sh" với quyền thực thi mà không đọc, ghi; người dùng có thể thực thi các lệnh chứa trong file này nhưng không thể mở file ra xem các lệnh đó là gì và cũng không thể thêm bớt, sửa chữa các lệnh trong file này. Việc xóa, đổi tên một file không được quyết định bởi quyền ghi với file đó mà bởi quyền ghi với thư mục chứa filed đó.
Ba quyền read, write, execute cũng được áp dụng với thư mục nhưng ý nghĩa của chúng thì khác hoàn toàn:
- read: quyền đọc một thư mục là quyền liệt kê các file, thư mục con của một thư mục.
- write: quyền ghi một thư mục là quyền tạo mới, xóa, đổi tên file và thư mục con của thư mục. Có thể xảy ra trường hợp: có quyền ghi một file tức là sửa chữa nội dung của file nhưng lại không có quyền đổi tên, xóa file nếu như không có quyền ghi với thư mục chứa file đó.
- execute: quyền thực thi một thư mục là quyền "đi vào" thư mục, chẳng hạn bằng lệnh cd. Có thể xảy ra trường hợp: có quyền thực thi nhưng lại không có quyền đọc một thư mục. Khi đó có thể "cd" một thư mục nhưng lại không thể "ls" nó ra. Khi thư mục không có quyền excute thì không thể truy cập nội dung các file trong thư mục đó.
Ex:
Giả sử user U1 có file FileOfU1 đặt trong /home/U1 muốn chia sẻ với các user khác nên đã đặt quyền r,w cho file. Tuy nhiên bản thân thư mục /home/U1 khi được tạo ra đã bị mặc định là không có quyền excute nên các user khác không thể đọc, ghi file /home/U1/FileOfU1 được.
Chủ sở hữu và root có quyền thay đổi quyền truy cập đối với cả 3 loại đối tượng: chủ sở hữu (user), nhóm chủ sở hữu (group), những user khác không thuộc 2 loại trên (others).
Lệnh thay đổi quyền truy cập:
chmod <quyền> <file>(viết tắt chmod = change mode)
Có 2 cách biểu diễn <quyền>: bằng kí tự hoặc bằng chữ số
- Cách1: Biểu diễn quyền bằng kí tự: quyền được biểu diễn bằng tổ hợp 3 loại kí tự sau

Ex:
 chmod u+r,o+s myfile
 chmod uo=rx,g=-myfile
 chmod a=rwx myfile (chmod ugo=rwx myfile)
 chmod +x myfile (chmod u+x,g+x,o+x myfile)
Chú ý: chmod u+r,o+x myfile và chmod u=r,o=x myfile là hai lệnh khác nhau
- Cách2: Biểu diễn quyền bằng chữ số octal: dùng 3 chữ số để biểu diễn quyền của 3 loại đối tượng u,g,o. Giá trị mỗi chữ số octal biểu diễn một quyền theo bảng sau:


 chmod 567 myfile (chmod u=rx,g=wx,o=rwx myfile)
 chmod 640 myfile (chmod u=wx,g=x,o=- myfile)
Note: Khi chmod đối với thư mục, nếu muốn áp dụng quyền nào đó cho tất cả các file và thư mục con trong đó thì cần thêm option là "-R"
Ex:
chmod 755 -R mydir
+ Link 1
Tag :
Linux Basic,
Linux PC
Users và Groups

1. Users
1.1 Khái niệm
Users là bất cứ ai sử dụng máy tính, OS cho phép tạo ra user để truy cập và điều khiển (access control) hệ thống file, tương tác với các service dưới kernel, ... etc.
Users được chia làm hai loại là:
+ normal user : trên một máy tính có thể có nhiều user loại thông thường này
+ superuser (root) : chỉ có duy nhất một user loại này
Trong đó superuser có quyền cao nhất, vd như nó có thể tương tác với kernel mà user thường không được cho phép. Để chuyển vào chế độ root từ user thì linux cung cấp lệnh su (fedora) hoặc sudo (ubuntu), để thoát khỏi chế độ root thì dùng lệnh exit hoặc Ctrl + D.
 [ninhld@localhost ~]$
 [ninhld@localhost ~]$
 [ninhld@localhost ~]$ su
 [root@localhost ninhld]#
 [root@localhost ninhld]#
 [root@localhost ninhld]# exit
 exit
 [ninhld@localhost ~]$
 [ninhld@localhost ~]$
 [ninhld@localhost ~]$
1.2 Quản lý users
Măc định khi cài đặt xong Linux OS thì bạn đã có một user và một superuser, các thao tác quản lý user phải được thực hiện bởi superuser
+ Tạo / Xóa user
Tạo mới
useradd <tên_user>Đặ password cho user
passwd <tên_user>Để xóa một user
userdel [-r] <tên_user> (tham số -r dùng để xóa luôn thư mục home của user)+ Remove user & root password
passwd -d <tên_user>
passwd -d root
/home
Khi một user được tạo ra thì có một thư mục mang tên user được tạo ra trong /home để chứa các dữ liệu cá nhân của user đó. Thông thường các user chỉ được thực hiện các quyền tạo mới, đọc, sửa, chạy các file và thư mục trong thư mục home của mình mà không được phép với thư mục home của người khác.
Riêng superuser có thư mục cá nhân của nó là /root. Các thư mục cá nhân của user/superuser được biểu diễn trên terminal bằng ký hiệu dẫu ngã "~"
 [ninhld@localhost ~]$
 [ninhld@localhost ~]$ ls -l ~
 total 128
 drwxrwxr-x. 5 ninhld ninhld 4096 Feb 19 00:29 carmeter
 drwxr-xr-x. 2 ninhld ninhld 49152 Jun 7 21:33 Desktop
 drwxr-xr-x. 6 ninhld ninhld 4096 Jun 7 10:53 Documents
 drwxr-xr-x. 3 ninhld ninhld 4096 Jun 19 23:12 Downloads
 drwx------. 14 ninhld ninhld 4096 Jun 20 21:02 Dropbox
 drwxrwxr-x. 5 ninhld ninhld 4096 Mar 14 19:38 freescale
 drwxrwxr-x. 8 ninhld ninhld 4096 Jun 14 16:25 Github
 drwxrwxr-x. 3 ninhld ninhld 4096 Dec 10 2014 GoldenDict
 drwxrwxrwx. 8 ninhld ninhld 4096 Apr 4 22:23 mini2440
 drwxr-xr-x. 2 ninhld ninhld 4096 May 31 21:06 Music
 drwxr-xr-x. 2 ninhld ninhld 16384 Jun 17 22:38 Pictures
 drwxr-xr-x. 2 ninhld ninhld 4096 Dec 10 2014 Public
 drwx------. 2 ninhld ninhld 4096 May 30 15:58 SkypeDownload
 drwxr-xr-x. 2 ninhld ninhld 4096 Dec 10 2014 Templates
 drwxr-xr-x. 3 ninhld ninhld 4096 May 30 20:09 Videos
 drwxrwxr-x. 4 ninhld ninhld 4096 May 23 21:02 VirtualBox VMs
 drwxrwxr-x. 5 ninhld ninhld 4096 May 24 10:51 workspace
 [ninhld@localhost ~]$
 [ninhld@localhost ~]$
 [ninhld@localhost ~]$ su
 [root@localhost ninhld]#
 [root@localhost ninhld]# ls -l ~
 total 8
 -rw-------. 1 root root 1284 Dec 10 2014 anaconda-ks.cfg
 -rw-r--r--. 1 root root 1301 Dec 10 2014 initial-setup-ks.cfg
 [root@localhost ninhld]#
 [root@localhost ninhld]#
 [root@localhost ninhld]# exit
 [ninhld@localhost ~]$
 [ninhld@localhost ~]$
User database
Local user information is stored in the /etc/passwd file. To list all user accounts on the system:
cat /etc/passwdThere is one line per account, and each is of the format:
account:password:UID:GID:GECOS:directory:shellwhere:
account is the user name
password is the user password
UID is the numerical user ID
GID is the numerical primary group ID for the user
GECOS is an optional field used for informational purposes; usually it contains the full user name
directory is the user's $HOME directory
shell is the user command interpreter (defaults to /bin/sh)
2. Groups
Để thuận tiện cho việc quản lý hàng loạt các user, người ta tạo ra các group là tập hợp các user có cùng quyền hạn đối với một số file hay thư mục nào đó. Chỉ cần một lần thiết lập quyền với file, thư mục cho group thì tất cả các user của group cũng được thiết lập quyền này theo nên rất thuận tiện. Cũng giống như với user, các thao tác dưới đây phải được thực hiện bởi superuser.
Tạo / Xóa / Liệt kê group
Tạo một group mới:
groupadd <tên_group>
Thêm / xóa user vào một group:
gpasswd [-a|d|A] <user_name> <group_name>
-a là add user vào group
-d là delete user khỏi group
-A là đặt một user làm Admininstrator củ a group. Một group có thể không có administrator
Một group có thể không có user, nhưng một user luôn phải thuộc về một group nào đó. Ngay khi một user được tạo ra nó được gán luôn vào một group nào đó gọi là primary group. Với Redhat, Fedora khi user được tạo ra thì một group cũng được tạo ra chứa duy nhất user này, group này có số hiệu GID bằng số hiệu UID của user vừa tạo. Sau primary group, user cũng có thể được add vào các group khác gọi là secondary group.
Một user có thể tham gia nhiều group, lệnh
groups [tên_user]liệt kê các group mà user tham gia. Nếu không có đối số tên_user thì mặc định user đang login là đối số .
Group cũng có thể có password nhưng ít gặp. Bình thường chỉ có root mới có quyền join một user vào một group nào đó nhưng khi group được đặt password thì normal user cũng có quyền join group đó bằng lệnh gpasswd –a nếu nó biết password.
Đặt password cho một group:
gpasswd <tên_group>gỡ password:
gpasswd –r <tên_group>Group database
cat /etc/groupDanh sách các group được lưu trong file /etc/group. Trong file này, mỗi group là một dòng gồm 4
trường, các trường ngăn cách nhau bởi dấu hai chấm:
- Group name: tên của group.
- Group password: Khi một group được đặt password, nó cho phép các user ngoài group join vào
group. Khi password được thiết lập nó thường không được lưu trong chính file /etc/group mà
được lưu vào một file khác là /etc/gshadow, điều này giống như việc password của user thường
được lưu trong /etc/shadow thay vì /etc/passwd.
- Group ID: mỗi một group có một số hiệu duy nhất gọi là GID. Linux quản lý group theo số GID
này.
- Group members: danh sách các member của group, các member cách nhau bởi dấu phẩy
Ví dụ : 3 dòng cuối của file /etc/group
nsd1:x:501:
nsd2:x:502:
Nhom1:x:503:nsd1, nsd2
Group “nsd1”, “nsd2” không có danh sách member chứng tỏ 2 group này chỉ là primary group củ a các user
“nsd1”, “nsd2”. GID “nsd1” = UID “nsd1” = 501; GID “nsd2” = UID “nsd2” = 502
Group “Nhom1” có GID là 503, có 2 member là nsd1, nsd2
Cả 3 dòng đều có chữ x thể hiện password của 3 group này nếu có sẽ được lưu trong file /etc/gshadow
File /etc/gshadow lưu password của các group mặc dù việc đặt password cho group không phải là việc làm thường thấy.
Trong file /etc/gshadow, mỗi group là một dòng gồm 3 trường, các trường ngăn cách nhau bởi dấu hai chấm
- group name
- group password đã được mã hóa
- administrator của group
- member thường của group
Ví dụ : 3 dòng cuối của file /etc/gshadow
nsd2: !! : :
Nhom1: !! : nsd1: nsd2, nsd3
Nhom2: !! : : nsd1, nsd2, nsd3
Cả 3 group đều không đặt password nên trườ ng password là hai dấu chấm than.
Group “nsd2” không có member chứng tỏ nó chỉ là primary group của user “nsd2”
Group “Nhom1” có administrator là user “nsd1”, 2 member thường là “nsd2”, “nsd3”
Group “Nhom2” không có adminstrator, chỉ có 3 member thườ ng là “nsd1”, “nsd2”, “nsd3”
Để bật/tắt chế độ sử dụng shadow password cho group, dùng lệnh:
gprpconv hoặc grpunconv
Xem thêm tại:
+ Link 1
Tag :
Linux Basic,
Linux PC
Basic Network Commands

link1
link2
The network commands chapter explains various tools which can be useful when networking with other computers both within the network and accross the internet, obtaining more information about other computers. This chapter also includes information on tools for network configuration, file transfer and working with remote machines.
netstat
Displays contents of /proc/net files. It works with the Linux Network Subsystem, it will tell you what the status of ports are ie. open, closed, waiting, masquerade connections. It will also display various other things. It has many different options.
tcpdump
This is a sniffer, a program that captures packets off a network interface and interprets them for you. It understands all basic internet protocols, and can be used to save entire packets for later inspection.
ping
The ping command (named after the sound of an active sonar system) sends echo requests to the host you specify on the command line, and lists the responses received their round trip time.
You simply use ping as:
ping ip_or_host_nameNote to stop ping (otherwise it goes forever) use CTRL-C (break).
Please note: Using ping/smbmount/ssh or other UNIX system programs with a computer name rather than IP address will only work if you have the computer listed in your /etc/hosts file. Here is an example:
192.168.1.100 new
This line says that their is a computer called “new” with IP address 192.168.1.100. Now that it exists in the /etc/hosts file I don't have to type the IP address anymore, just the name “new”.
hostname
Tells the user the host name of the computer they are logged into. Note: may be called host.
traceroute
traceroute will show the route of a packet. It attempts to list the series of hosts through which your packets travel on their way to a given destination. Also have a look at xtraceroute (one of several graphicalequivalents of this program).
Command syntax:
traceroute machine_name_or_ip
tracepath
tracepath performs a very simlar function to traceroute the main difference is that tracepath doesn't take complicated options.
Command syntax:
tracepath machine_name_or_ip
findsmb
findsmb is used to list info about machines that respond to SMB name queries (for example windows based machines sharing their hard disk's).
Command syntax:
findsmb
This would find all machines possible, you may need to specify a particular subnet to query those machines only...
nmap
“ network exploration tool and security scanner”. nmap is a very advanced network tool used to query machines (local or remote) as to whether they are up and what ports are open on these machines.
A simple usage example:
nmap machine_nameThis would query your own machine as to what ports it keeps open. nmap is a very powerful tool, documentation is available on the nmap site as well as the information in the manual page.
Network Configuration
ifconfig
This command is used to configure network interfaces, or to display their current configuration. In addition to activating and deactivating interfaces with the “up” and “down” settings, this command is necessary for setting an interface's address information if you don't have the ifcfg script.
Use ifconfig as either:
ifconfig
This will simply list all information on all network devices currently up.
ifconfig eth0 downThis will take eth0 (assuming the device exists) down, it won't be able to receive or send anything until you put the device back “up” again.
Clearly there are a lot more options for this tool, you will need to read the manual/info page to learn more about them.
ifup
Use ifup device-name to bring an interface up by following a script (which will contain your default networking settings). Simply type ifup and you will get help on using the script.
For example typing:
ifup eth0Will bring eth0 up if it is currently down.
ifdown
Use ifdown device-name to bring an interface down using a script (which will contain your default network settings). Simply type ifdown and you will get help on using the script.
For example typing:
ifdown eth0Will bring eth0 down if it is currently up.
ifcfg
Use ifcfg to configure a particular interface. Simply type ifcfg to get help on using this script.
For example, to change eth0 from 192.168.0.1 to 192.168.0.2 you could do:
ifcfg eth0 del 192.168.0.1The first command takes eth0 down and removes that stored IP address and the second one brings it back up with the new address.
ifcfg eth0 add 192.168.0.2
route
The route command is the tool used to display or modify the routing table. To add a gateway as the default you would type:
route add default gw some_compute
Internet Specific Commands
Note that should DNS not be configured correctly on your machine, you need to edit “/etc/resolv.conf” to make things work...
host
Performs a simple lookup of an internet address (using the Domain Name System, DNS). Simply type:
host ip_addressdig
or
host domain_name
The "domain information groper" tool. More advanced then host... If you give a hostname as an argument to output information about that host, including it's IP address, hostname and various other information.
For example, to look up information about “www.amazon.com” type:
dig www.amazon.comTo find the host name for a given IP address (ie a reverse lookup), use dig with the `-x' option.
dig -x 100.42.30.95This will look up the address (which may or may not exist) and returns the address of the host, for example if that was the address of “http://slashdot.org” then it would return “http://slashdot.org”.
dig takes a huge number of options (at the point of being too many), refer to the manual page for more information.
whois
(now BW whois) is used to look up the contact information from the “whois” databases, the servers are only likely to hold major sites. Note that contact information is likely to be hidden or restricted as it is often abused by crackers and others looking for a way to cause malicious damage to organisation's.
wget
(GNU Web get) used to download files from the World Wide Web.
To archive a single web-site, use the -m or --mirror (mirror) option.
Use the -nc (no clobber) option to stop wget from overwriting a file if you already have it.
Use the -c or --continue option to continue a file that was unfinished by wget or another program.
Simple usage example:
wget url_for_fileThis would simply get a file from a site.
wget can also retrieve multiple files using standard wildcards, the same as the type used in bash, like *, [ ], ?. Simply use wget as per normal but use single quotation marks (' ') on the URL to prevent bash from expanding the wildcards. There are complications if you are retrieving from a http site (see below...).
Advanced usage example, (used from wget manual page):
wget --spider --force-html -i bookmarks.htmlThis will parse the file bookmarks.html and check that all the links exist.
Advanced usage: this is how you can download multiple files using http (using a wildcard...).
Notes: http doesn't support downloading using standard wildcards, ftp does so you may use wildcards with ftp and it will work fine. A work-around for this http limitation is shown below:
wget -r -l1 --no-parent -A.gif http://www.website.com[1]This will download (recursively), to a depth of one, in other words in the current directory and not below that. This command will ignore references to the parent directory, and downloads anything that ends in “.gif”. If you wanted to download say, anything that ends with “.pdf” as well than add a -A.pdf before the website address. Simply change the website address and the type of file being downloaded to download something else. Note that doing -A.gif is the same as doing -A “*.gif” (double quotes only, single quotes will not work).
wget has many more options refer to the examples section of the manual page, this tool is very well documented.
Alternative website downloaders: You may like to try alternatives like httrack. A full GUI website downloader written in python and available for GNU/Linux
curl
curl is another remote downloader. This remote downloader is designed to work without user interaction and supports a variety of protocols, can upload/download and has a large number of tricks/work-arounds for various things. It can access dictionary servers (dict), ldap servers, ftp, http, gopher, see the manual page for full details.
To access the full manual (which is huge) for this command type:
curl -M
For general usage you can use it like wget. You can also login using a user name by using the -u option and typing your username and password like this:
curl -u username:password http://www.placetodownload/fileTo upload using ftp you the -T option:
curl -T file_name ftp://ftp.uploadsite.comTo continue a file use the -C option:
curl -C - -o file http://www.site.com
Remote Administration Related
ssh
Secure shell, remotely login on a machine running the sshd daemon. Once you are logged in you have a secure shell and are able to execute various commands on that computer such as copy files, reboot the computer, just like it was your own GNU/Linux PC.
Or you can use ssh with a full hostname to connect to a remote machine (as in across the internet).
Examples:
ssh hostnameConnect to a remote system with your current username, you will obviously need the password of the user on the other machine.
ssh username@hostnameConnect to a remote system with your a different username, you will obviously need the password of the user on the other machine.
scp
Secure copy, part of the ssh package. Allows you to copy files from one computer to another computer, use -r to copy recursively (copy entire directories and subdirectories).
scp's syntax is always
scp machineToBeCopiedFrom machineToBeCopiedTo
Where either machine can be a local directory (on the current filesystem /) or a remote machine. Remote machines are usually machinesFullName:/directory (if you omit the directory part it will just assume the home directory of the username you are logging in with).
The example below copies all files from the current directory (not including any directories), the command will login to “new” using the username of the person currently logged in on the local computer, the files will be copied to the root directory of the remote computer called “new” (which is probably on the LAN):
scp * new:/
You could also copy files from another computer to another computer. Let's say you are on a computer called “p100”. And you want to copy files (and directories) from “hp166” (in the /tmp directory and anything below that) to “new” and put the files in new's temporary directory. You could do:
scp -r hp166:/tmp new:/tmp
Assuming you were logged in as “fred” you would need passwords for user “fred” on the computers hp166 and new. Add an user_name@ before the computer name to login under a different user name.
For example to perform the above command with user “root” on hp166 and “anon” on new you would type:
scp -r root@hp166:/tmp anon@new:/tmp
To copy from a remote machine to a local computer you simply do things in reverse:
scp remoteMachine:/mystuff/* .
This will copy files on the remote machine in the directory “mystuff” to your local computer.
Remote Machines: Please note that when working with a remote machine you need to have a : (colon) after the machine name even if you want the files in their home directory. Otherwise the command will fail.
sftp
Secure ftp, another part of the ssh package. This command is similar to ftp but uses an encrypted tunnel to connect to an ftp server and is therefore more secure than just plain ftp.
The command usage is very similar to ftp (the command-line tool), sftp (once running) uses commands such as help (for help), put (send files to the server), get (download files from the server) and various others, refer to the manual page and internal documentation for further details.
FTP
To connect to an FTP server, simply run the ftp(1) command and specify the host:
ftp <hostname> [port]If the host is running an FTP server, it will ask for a username and password. You can log in as yourself or as “anonymous”. Anonymous FTP sites are very popular for software archives. For example, to get Slackware Linux via FTP, you must use anonymous FTP.
Once connected, you will be at the ftp> prompt. There are special commands for FTP, but they are similar to other standard commands. The following shows some of the basic commands and what they do:
| Command | Purpose |
|---|---|
| ls | List files |
| cd <dirname> | Change directory |
| bin | Set binary transfer mode |
| ascii | Set ASCII transfer mode |
| get <filename> | Download a file |
| put <filename> | Upload a file |
| hash | Toggle hash mark stats indicator |
| tick | Toggle byte counter indicator |
| prom | Toggle interactive mode for downloads |
| mget <mask> | Download a file or group of files; wildcards are allowed |
| mput <mask> | Upload a file or group of files; wildcards are allowed |
| quit | Log off the FTP server |
Tag :
Linux Basic,
Linux PC
