
Showing posts with label Telegram. Show all posts
Google Apps Script and Telegram bot
1.Overview

2.Setup
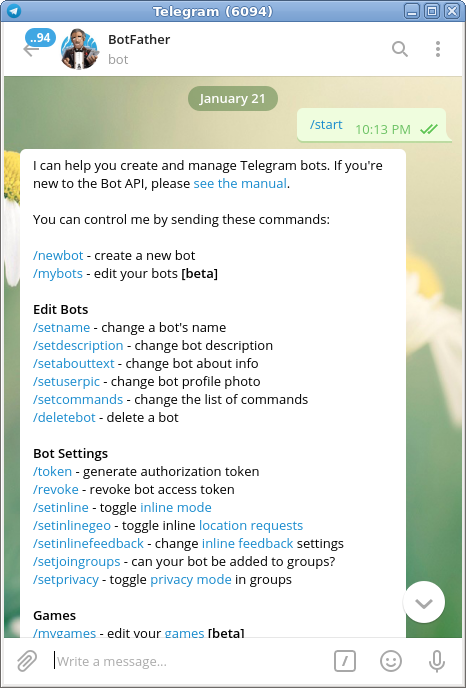
2.1 Create Telegram bot
Chat with BotFater to create Telegram bot and get TOKEN (red frame)

2.2 Create Apps Script
Step1: Go to https://script.google.com/ and create new script.
Select "Publish > Deploy as web app" to get web app url


Code.gs
var token = "23947923427:kahsdkajsdgsakjdaksjdbkhyjhhd"; // FILL IN YOUR OWN TOKEN
var telegramUrl = "https://api.telegram.org/bot" + token;
var webAppUrl = "https://script.google.com/macros/s/AKfycbxasdhhwuihuip17OHRD7gcajsdhkjasjpSMtKjh2tue40MSHY74/exec"; // FILL IN YOUR GOOGLE WEB APP ADDRESS

function doGet(e) {
  return HtmlService.createHtmlOutput("Hi there");
}


function getMe() {
  var url = telegramUrl + "/getMe";
  var response = UrlFetchApp.fetch(url);
  Logger.log(response.getContentText());
}

function setWebhook() {
  var url = telegramUrl + "/setWebhook?url=" + webAppUrl;
  var response = UrlFetchApp.fetch(url);
  Logger.log(response.getContentText());
}

function sendText(id,text) {
  var url = telegramUrl + "/sendMessage?chat_id=" + id + "&text=" + text;
  var response = UrlFetchApp.fetch(url);
  Logger.log(response.getContentText());
}

function doPost(e) {
  // this is where telegram works
  //console.log(e)

  var data = JSON.parse(e.postData.contents);
  var text = data.message.text;
  var id = data.message.chat.id;
  var name = data.message.chat.first_name;
  var answer = "Hi " + name + ", thank you for your comment " + text;
  sendText(id,answer);
}
Update code by run "Publish > Deploy as web app" again.
Note: select "New" in project version.


Okey, try to use.

Tag :
Google Apps Script,
Telegram
Telethon
1.Giới thiệu
Telethon là Python 3 MTProto API Telegram client library.
Source code và hướng dẫn khác:
- https://docs.telethon.dev
2.Cài đặt và sử dụng
$pip3 install telethon

Chạy thử ví dụ demo:

Note:
Để làm được telegram app client cần phải có API ID, API hash, làm theo hướng dẫn từ trang chủ Telegram.
https://core.telegram.org/api/obtaining_api_id
Obtaining api_id
In order to obtain an API id and develop your own application using the Telegram API you need to do the following:
(1)Sign up for Telegram using any application.
(2)Log in to your Telegram core: https://my.telegram.org.
(3)Go to 'API development tools' and fill out the form.
(4)You will get basic addresses as well as the api_id and api_hash parameters required for user authorization.
(5)For the moment each number can only have one api_id connected to it.
We will be sending important developer notifications to the phone number that you use in this process, so please use an up-to-date number connected to your active Telegram account.
Tag :
Raspberry PI,
Telegram
Telegram CLI on Raspberry PI
1.Giới thiệu
Telegram CLI là một chương trình telegram client giống như telegram app trên điện thoại hoặc máy tính vậy, chỉ khác một điều là chương trình này chạy trên giao diện dòng lệnh (command line) chứ nó không có giao diện đồ họa như telegram app thông thường.
Source code và các hướng dẫn xem tại trang chủ:
https://github.com/vysheng/tg
2.Cài đặt trên raspberry pi
Việc build telegram cli trên máy tính không gặp vẫn đề gì, tuy nhiên khi build và chạy trên raspberry pi sẽ có một vài lỗi vì thế cần chỉnh sửa nhỏ.
Note:
- Bài viết này sử dụng hệ điều hành raspbian buster lite (2019-09-26-raspbian-buster-lite.img)
- Việc build telegram trên raspberry pi thật sẽ rất chậm nên bài viết này sử dụng QEMU cho nhanh
(1) git clone https://github.com/vysheng/tg.git && cd tg
(2) Comment out hoặc delete 2 dòng 101 and 115 ở file tgl/mtproto-utils.c
//assert (0); <= comment out or delete
static unsigned long long BN2ull (TGLC_bn *b) {
  if (sizeof (unsigned long) == 8) {
    return TGLC_bn_get_word (b);
  } else if (sizeof (unsigned long long) == 8) {
    //assert (0); // As long as nobody ever uses this code, assume it is broken.   <<== comment out
    unsigned long long tmp;
    /* Here be dragons, but it should be okay due to be64toh */
    TGLC_bn_bn2bin (b, (unsigned char *) &tmp);
    return be64toh (tmp);
  } else {
    assert (0);
  }
}

static void ull2BN (TGLC_bn *b, unsigned long long val) {
  if (sizeof (unsigned long) == 8 || val < (1ll << 32)) {
    TGLC_bn_set_word (b, val);
  } else if (sizeof (unsigned long long) == 8) {
    //assert (0); // As long as nobody ever uses this code, assume it is broken. <<== comment out
    htobe64(val);
    /* Here be dragons, but it should be okay due to htobe64 */
    TGLC_bn_bin2bn ((unsigned char *) &val, 8, b);
  } else {
    assert (0);
  }
}
(3) sudo apt-get install libreadline-dev libconfig-dev libssl-dev lua5.2 liblua5.2-dev libevent-dev libjansson-dev libpython-dev make
(4) sudo apt install libssl1.0-dev
(5) ./configure
(6) nano Makefile (deleting -Werror)
Xóa -Werror trong config dưới đây
COMPILE_FLAGS=${CFLAGS} ${CPFLAGS} ${CPPFLAGS} ${DEFS} -Wall -Werror -Wextra -Wno-missing-field-initializers -Wno-deprecated-declarations -fno-strict-aliasing -fno-omit-frame-pointer -ggdb -Wno-unused-parameter -fPIC
Note:
- (2) Fix run bug
$ bin/telegram-cli -k tg-server.pub
Telegram-cli version 1.4.1, Copyright (C) 2013-2015 Vitaly Valtman
Telegram-cli comes with ABSOLUTELY NO WARRANTY; for details type `show_license'.
This is free software, and you are welcome to redistribute it
under certain conditions; type `show_license' for details.
Telegram-cli uses libtgl version 2.1.0
Telegram-cli includes software developed by the OpenSSL Project
for use in the OpenSSL Toolkit. (http://www.openssl.org/)
I: config dir=[/home/user/.telegram-cli]
[/home/user/.telegram-cli] created
[/home/user/.telegram-cli/downloads] created
> SIGNAL received
No libexec. Backtrace disabled
assertion "0" failed: file "tgl/mtproto-utils.c", line 101, function: BN2ull
- (4) Fix build bug
tgl/crypto/rsa_pem_openssl.c:41:6: error: dereferencing pointer to incomplete type ‘RSA’ {aka ‘struct rsa_st’}
ret->e = unwrap_bn (TGLC_bn_new ());
- (6) Fix build bug
tgl/tl-parser/tl-parser.c:1907:26: error: ‘sprintf’ may write a terminating nul past the end of the destination [-Werror=format-overflow=]
sprintf (s, "%lld", lrand48 () * (1ll << 32) + lrand48 ());
3.Chạy ứng dụng
Sau khi make xong, chương trình đã được để trong thư mục bin
pi@raspberrypi:~/tg $ bin/telegram-cli --help
telegram-cli Usage
--phone/-u specify username (would not be asked during authorization)
--rsa-key/-k specify location of public key (possible multiple entries)
--verbosity/-v increase verbosity (0-ERROR 1-WARNIN 2-NOTICE 3+-DEBUG-levels)
--enable-msg-id/-N message num mode
--config/-c config file name
--profile/-p use specified profile
--log-level/-l log level
--sync-from-start/-f during authorization fetch all messages since registration
--disable-auto-accept/-E disable auto accept of encrypted chats
--lua-script/-s lua script file
--wait-dialog-list/-W send dialog_list query and wait for answer before reading input
--disable-colors/-C disable color output
--disable-readline/-R disable readline
--alert/-A enable bell notifications
--daemonize/-d daemon mode
--logname/-L <log-name> log file name
--username/-U <user-name> change uid after start
--groupname/-G <group-name> change gid after start
--disable-output/-D disable output
--tcp-port/-P <port> port to listen for input commands
--udp-socket/-S <socket-name> unix socket to create
--exec/-e <commands> make commands end exit
--disable-names/-I use user and chat IDs in updates instead of names
--enable-ipv6/-6 use ipv6 (may be unstable)
--help/-h prints this help
--accept-any-tcp accepts tcp connections from any src (only loopback by default)
--disable-link-preview disables server-side previews to links
--bot/-b bot mode
--json prints answers and values in json format
--permanent-msg-ids use permanent msg ids
--permanent-peer-ids use permanent peer ids
Chạy thử chương trình:
pi@raspberrypi:~/tg $ ./bin/telegram-cli -k tg-server.pub
Sau đó nhập phone number và mã code OTP mà telegram gửi về cho bạn

4. Python wraps around telegram cli
Telegram CLI chỉ là một chương trình cơ bản nhất chạy bằng command line, vì thế trong thực tế cần có một chương trình wrapper để sử dụng telegram cli từ một chương trình khác.
Ví dụ trong bài viết này đang muốn làm một giao diện chat cho telegram bằng python chẳng hạn, thì khi này cần một wrapper bằng python.
Bài viết này giới thiệu một wrapper được làm sẵn, cài đặt và sử dụng xem tại trang chủ dưới đây:
https://github.com/luckydonald/pytg
Tag :
Raspberry PI,
Telegram
Using Telegram Bot to control Raspberry PiVPN

Bài viết trước: Sử dụng Raspberry Pi làm VPN server
1.Giới thiệu
Cài đặt Telegram Bot lên raspberry để điều khiển từ xa chương trình PiVPN
2.Cài đặt
2.1 Tạo Telebot
Mở ứng dụng telegram và search BotFather:

Khi vào trong thì nó hiện những hướng dẫn để tạo bot:
Chat với BotFather bằng cách gửi tin nhắn : /newbot
Sau đó nhập tên và username cho bot, lưu ý username phải có chữ bot ở cuối:

Thế là đã tạo xong bot, nó sẽ gửi cho cái TOKEN (khung màu đỏ như hình trên) dùng để viết chương trình điều khiển con bot này.
2.2 Install telebot
pip install telepot
Link:
- Bot API
2.3 Install PiVPN Telebot
- Tải chương trình
git clone https://github.com/eslinux/PiVPN-Telebot.git

- Cài đặt
Để cài đặt app này cần chuẩn bị sẵn 2 thông tin:
(1) Bot TOKEN
Đã tạo ra ở bước đầu tiên 2.1 lúc tạo bot rồi .
(2,3) Username và Chat ID của tài khoản telegram của bạn
Chỉ cần chat với userinfobot nó sẽ trả về chat ID và username của bạn.

Chạy file install.sh, nhập các thông tin TOKEN, username và chat ID:
Note: username của bạn có thể nhập tùy ý, ko cần đúng như của userinfobot trả về.

Thế là xong, mở telegram lên, tìm kiếm tên con bot đã tạo và chat với nó:

2.4 Hướng dẫn sử dụng
2.4.1 User
Được phân loại thành 2 loại là admin và normal
Chương trinhg bot này cho phép nhiều người có thể điều khiển, người đầu tiên chính là bạn (có username & chat id đã nhập khi install chương trình), sẽ có quyền cao nhất là quyền admin.
Bạn sẽ add thêm người dùng bằng lệnh /adduser, những người này bạn cũng sẽ cấp cho họ quyền admin hoặc normal
2.4.2 Nhóm lệnh
Có 3 nhóm lệnh
(1) Control all PiVPN specific functions!
(2) Admin management
(3) Pi management
- user admin có thể sử dụng tất cả các nhóm lệnh
- user normal chỉ có thể dùng nhóm lệnh (1)
Note:
- Source code chương trình bot
- Lệnh /updatebot sẽ tải chương trình mới nhất từ github nên bạn cần cài wget trước khi dùng lệnh này.
END.
